The sdcard is a “buildroot” image (everything was cross-compiled from source code). And I have not fully dug into the details (yet), but I assume that the Debian image is a “debootstrap” with apt pointed to a point in time of sid binary packages for the risc-v architecture. There is currently no Debian Stable release that supports risc-v (yet). Now that more RISC-V hardware is in the hands of developers that will probably change, there are some packages in .Debian Testing (so maybe the next release will see an official risc-v Debian stable).
I downloaded the sdcard.img and would agree with your assumptions.
Regards
Aubrey
I’m stuck at this step:
- transfer the latest uboot/spl files into board by USB or Ethernet;
I know how to transfer to the board from my Windows PC but I am having trouble finding the uboot/spl files to transfer. The docs point me to two Github repos but there are 100s (perhaps 1000s) of files there and it’s not clear what to download.
If the u-boot and spl files need to be built from source I’m OK with that but I think the instructions are missing something:
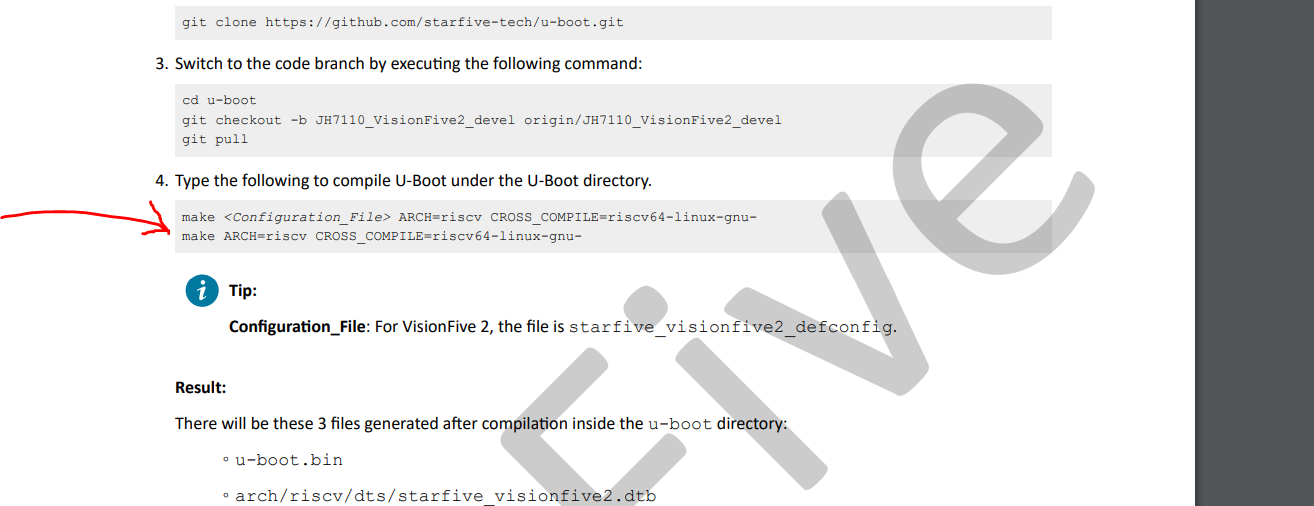
If I execute just the command given, it only does this:
make starfive_visionfive2_defconfig ARCH=riscv CROSS_COMPILE=riscv64-linux-gnu-make ARCH=riscv CROSS_COMPILE=riscv64-linux-gnu-
configuration written to .config
It takes no time at all and no files are generated other than the .config file. ![]()
You can find the links to the two files (SPL and U-Boot) in this post.
1 Like
Hey that was a success! Thanks all!
I’ll post a complete account of what I did to get Debian to boot shortly. The information is all here but it’s scattered across multiple threads.
5 Likes
If I remember correctly, of the 5 or 6 Earlybird SBCs I have ordered so far, none could boot from NVME when delivered.
I often fall asleep during podcasts in which a developer shows for 4 hours how he analyses and fixes a bug in the firmware, so I like to order SBC as Earlybird. I can look over the developers’ shoulders, try to solve the problems myself at the same time, or read what solutions other users find and learn more than if I buy a fully developed version of the board later.
1 Like
I am tremendously happy for you and your doubtlessly healthy sleeping habits.
However, this does not address my concerns at all.
Aubrey
Thanks all, my board arrived today and I was able to piece together the steps to get it going. I found the description a bit too terse, so here’s my longer version … argh, can’t post that because it references the same link that Michael Zhu used.
For the next release, please add IPv6 to the kernel. It is needed.
BTW, I’m trying to rebuild my kernel with IPv6.
Hello @dtometzki . May I ask how to do this?
Hello everyone,
I already saw solutions to upgrade firmware by using buildroot sdcardimage, but I did not noticed that so I will provide how I have solved this problem. It still may be usefull for others even it is quite builky I would say (but does not require to reflash SD card atleast :D)
Note: I have done everything mentione bellow by accesing u-boot from serial console , as well as using Linux machine, not Windows.
First stage (temporary boot debian 69 with old firmware):
-
Mount sd card boot partition (partition 2) to your PC:
sdc 8:32 1 29,8G 0 disk
├─sdc1 8:33 1 16M 0 part
├─sdc2 8:34 1 100M 0 part
└─sdc3 8:35 1 29,6G 0 part -
Copy device tree for correct naming:
cp {mount_point}/boot/dtbs/starfive/jh7110-visionfive-v2.dtb {mount_point}/boot/dtbs/starfive/starfive_visionfive2.dtb
This should help withFailed to load /boot/dtbs/starfive/starfive_visionfive2.dtberror -
put SD to device and boot, wait till it fails to boot, because of:
kernel_comp_addr_r or kernel_comp_size is not provided!(or stop boot manually) -
Now set kernel address and size:
setenv kernel_comp_addr_r 0x50000000
setenv kernel_comp_size 0x1000000 -
Boot again (now it should boot to login prompt):
run bootcmd
Second stage (firmware updating):
It is same as described in: Updating SPL and U-Boot, but instead of compiling binaries, you can download u-boot-spl.bin.normal.out and visionfive2_fw_payload.img from Releases · starfive-tech/VisionFive2 · GitHub
-
Install mtd-utils
apt install mtd-utils -
download
u-boot-spl.bin.normal.outandvisionfive2_fw_payload.img -
flash firmware to corresponding locations:
flashcp -v u-boot-spl.bin.normal.out /dev/mtd0
flashcp -v visionfive2_fw_payload.img /dev/mtd1
Hope it helps! Have a nice day!
2 Likes
This looks super promising, thank you for sharing! At step 3 currently. Not sure whether or not the green activity LED should be blinking, as I’m still not seeing anything but the red. Been waiting for about 5 minutes now- is the “wait til it fails to boot” supposed to take this long? Should there still be no HDMI output? Thank you again!!
edit: Never saw anything, so went to try this on img-55 for the hell of it but dev/mtd0 and dev/mtd1 don’t exist on there. Ah well, worth a shot!
@Maztitos, I am not sure about HDMI, I have used serial console only.
And in this step it will not boot, because you still need to set kernel_comp_addr_r and kernel_comp_size, this is why only RED light is present.
If you are not able to use serial console probably it is not possible to enter u-boot commands.
Anyway, I have tried to flash old firmware to reproduce issue and try to fix with buildroot image.
There is advantage that you do not need to use serial console but instead ssh to client instead so maybe it is easier!
So the steps are:
- Go to VisionFive2 SDK releases:
Releases · starfive-tech/VisionFive2 · GitHub - From newest SDK (atm 2.6.0) assets download:
sdcard.img
u-boot-spl.bin.normal.out
visionfive2_fw_payload.img - Flash
sdcard.imgto your SD CARD with balena etcher or so - copy u-boot-spl.bin.normal.out and visionfive2_fw_payload.img. (wget in buildroot is built without TLS support, so you can not download files directly):
OPTION 1: Mount this SD CARD to your computer and copy to root homepath location
sudo cp u-boot-spl.bin.normal.out visionfive2_fw_payload.img /media/{user}/rootfs/root/
OPTION 2: use SCP to copy files after device boots and connects to network
- Now Board should boot successfully (and green light should blink as well)
- ssh to board after some time:
ssh root@{boad_local_ip_address}
Password:starfive - now you can flash new firmware from this build:
flashcp -v u-boot-spl.bin.normal.out /dev/mtd0
flashcp -v visionfive2_fw_payload.img /dev/mtd1 - Flash Debian image to your SD card again and it will boot successfully this time.
- Do not forget ro resize FS: Extend Partition
My apologies if first explanaition is not clear enough. Probably buildroot image is the best option.
4 Likes
Hello together,
i tested the image with the newest u-boot release VF2_v2.8.0 and Linux kernel release VF2_v2.8.0
Boot was successfully and other test in progress.
Best regards
Damian
6 Likes
Thanks Damian. Did you use the steps from GitHub - starfive-tech/linux to update the kernel or some other way?
Hello @tommythorn,
for the u-boot and opensbi update the following guide:
for the kernel upgrade:
I use a separate debian maschine to CROSS build the custom linux-*.deb packages.
You can use the prepare steps from this guide and for the build is the following command:
make ARCH=riscv CROSS_COMPILE=riscv64-linux- -j4 bindeb-pkg
My output for the kernel is:

Best regards
Damian
1 Like
I just got my board and decided to create a build environment in docker to build for this. The main advantage is the possibility to select base os for the cross compiler without dedicating a computer or vm for it.
Here’s the repo: GitHub - kng/visionfive2-docker: Docker build environment for VisionFive 2 SBC
5 Likes
Knegge is a rockstar!!!
Using his docker shell and build scripts:
In less than 10 minutes, you’ll have built everything you need:
building u-boot: 1min
building opensbi: 10s
building spl: 1s
kernel: 7.5 minutes !!! I’m not used to short kernel builds so this was a pleasant surprise.
Enormous time savings if you use this.
3 Likes
I’ts pretty straight forward, clone the repo, build the image, run the scripts one by one. I’ve updated the readme to include the clone/build.
Have a look inside the script to see what they’re doing, basically slightly modified commands from the technical reference manual.
The order is the same as in the readme, and the manual.
Regarding docker installation I’m afraid I have to point you to your distro’s instructions or official install guide. I have a short description in another project but ymmv.
The actual image that the dockerfile pulls in is ubuntu:bionic, the same as in the manual. This is completely separate from the host OS. It should also allow for other arches as well, not only x86.
If you just run the shell you can play around in the container:
$ ./shell.sh
root@0e896ca78870:/mnt# cat /etc/os-release
NAME="Ubuntu"
VERSION="18.04.6 LTS (Bionic Beaver)"
ID=ubuntu
ID_LIKE=debian
PRETTY_NAME="Ubuntu 18.04.6 LTS"
VERSION_ID="18.04"
HOME_URL="https://www.ubuntu.com/"
SUPPORT_URL="https://help.ubuntu.com/"
BUG_REPORT_URL="https://bugs.launchpad.net/ubuntu/"
PRIVACY_POLICY_URL="https://www.ubuntu.com/legal/terms-and-policies/privacy-policy"
VERSION_CODENAME=bionic
UBUNTU_CODENAME=bionic
2 Likes