Connecting to VisionFive’s JTAG port, a short guide

After some research along with @luojia, NickCao, Icenowy, we seem to have figured out how to connect to the JTAG port on VisionFive. In other words, it seems that 请问如何JTAG调试Visionfive板子? is solved.

Massive thanks to them for the work; I’m just here to report what we now know. Any mistakes in the following descriptions, however, are my own.

There are two locations on the board where a JTAG port is available, marked a and b in this photo:

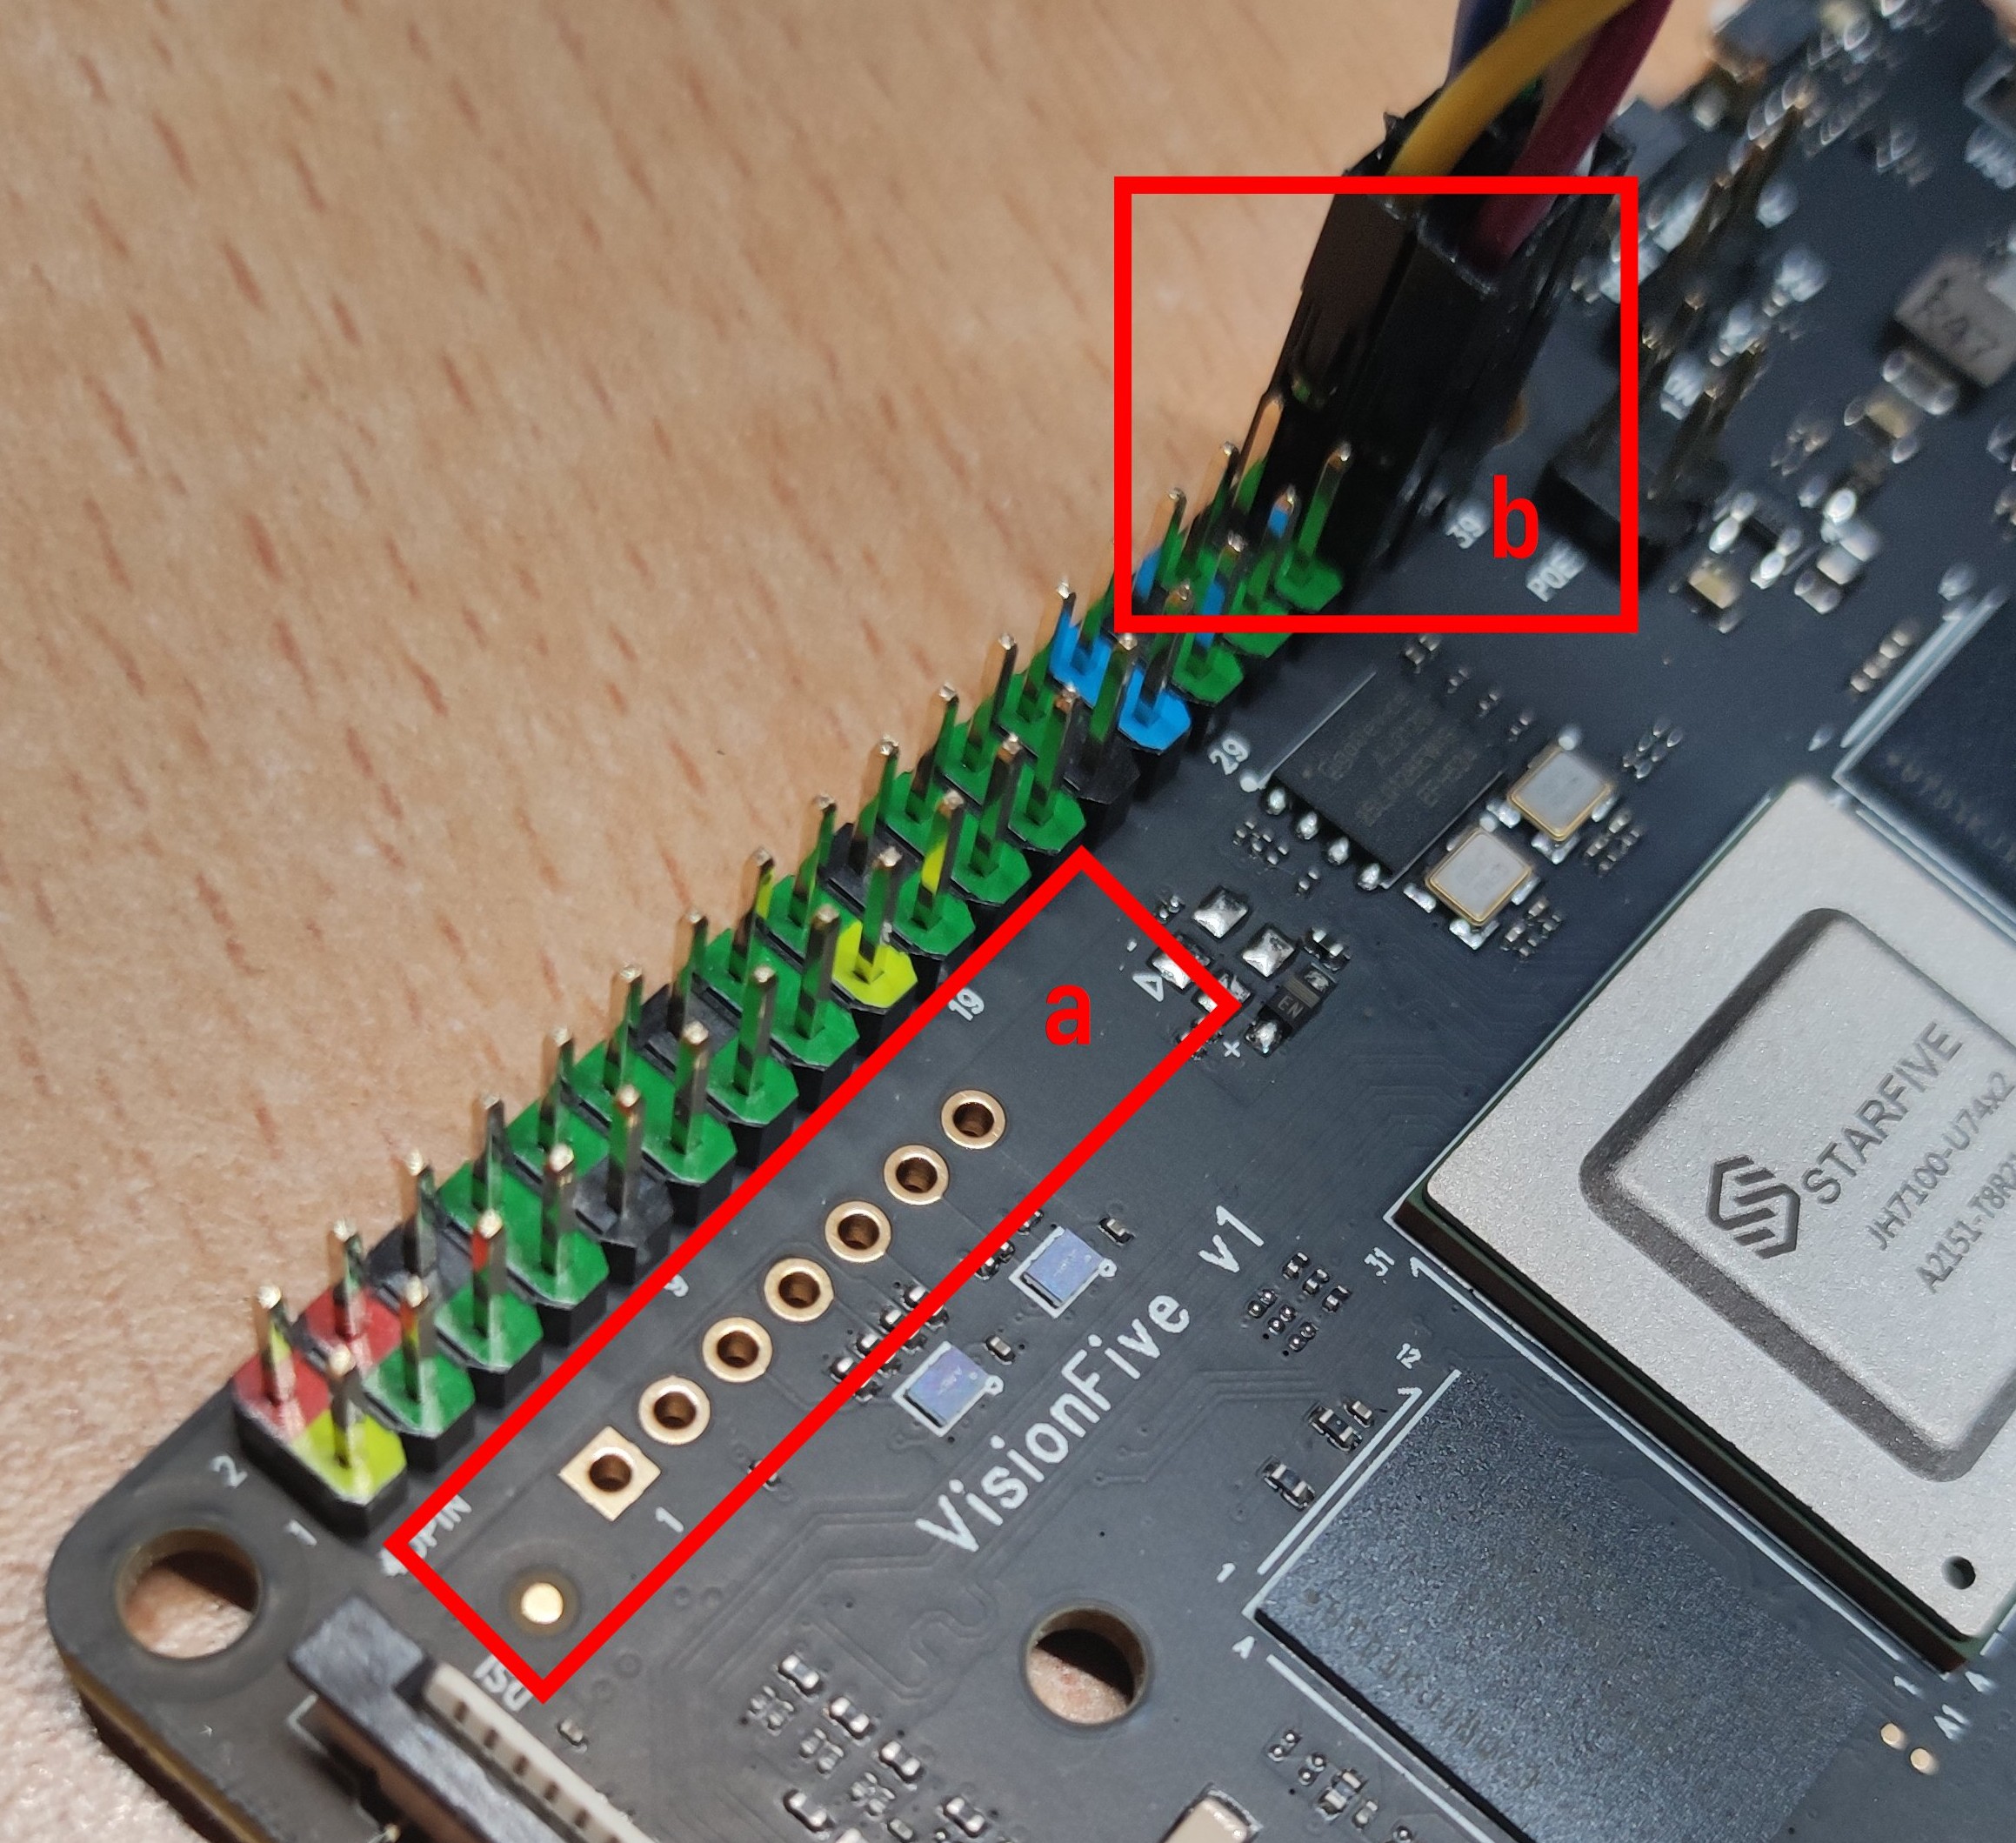
First is location a, the seven through-holes next to the 40-pin connectors:

The other is location
b, pins 35 through 40 on the 40-pin connector, which are labelled both GPIO0...4 and U74_{TCK,TMS,TDI,TDO,TRSTN} on the schematic

On location a, JTAG access is available in these cases:

  • Just after powering up or reset (unlikely to hit)
  • Booting with BOOT MODE button held down to enter UART recovery console

After the bootloader is started, JTAG switch from location a to location b. However, by default Linux (at least the version found in https://github.com/starfive-tech/linux) disconnects them at startup, which leaves neither location a nor location b having a JTAG connection.

To preserve JTAG access on location b, either of the following will work:

  • Append pinctrl-starfive.keepmux=1 to the kernel command line

  • Patch jh7100-starfive-visionfive-v1.dts so that the line

    starfive,keep-gpiomux = <13 14 63>;
    

    becomes

    starfive,keep-gpiomux = <0 1 2 3 4 13 14 63>;
    

After connecting, debugging will work with riscv-openocd. This is the config script for OpenOCD I’ve used. I’ve been using a Raspberry Pi as an adapter connected to JTAG location b. If you’re using another adapter, the first few lines might need changing.

# config.tcl

adapter driver linuxgpiod

linuxgpiod gpiochip 0
linuxgpiod jtag_nums 11 25 10 9
linuxgpiod trst_num 7

reset_config trst_only

transport select jtag

jtag newtap e24 cpu -irlen 5 -expected-id 0x200005fd
jtag newtap u74 cpu -irlen 5 -expected-id 0x200003fd

target create e24.cpu0 riscv -chain-position e24.cpu -coreid 0
target create u74.cpu0 riscv -chain-position u74.cpu -coreid 0 -rtos hwthread
target create u74.cpu1 riscv -chain-position u74.cpu -coreid 1
target smp u74.cpu0 u74.cpu1

init

Start OpenOCD with:

$ openocd -f config.tcl

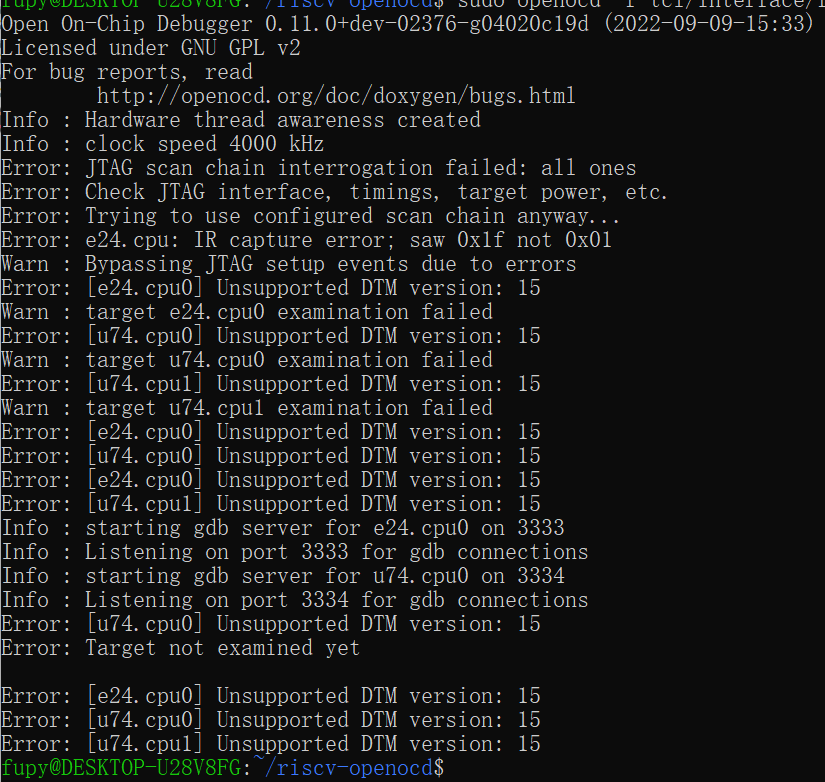
The E24 core and the U74 cores are on separate TAPs, so two gdbserver ports will be available. In this case, port 3334 was the U74 cores, and I was able to halt cores read some CSRs:

Known issues

For an unknown reason, debug access seems to be exceedingly slow or even unusable when Linux is running. I have successfully halted and resumed the U74 cores under Linux. It’s just frustrating.

The E24 core does not respond to the debugger when Linux is running. Comment out the line target create e24.cpu0 ... seems to help avoid OpenOCD getting stuck, and might also help with the previous issue.

What’s going on?

If I find the time and energy, which I hope I do, I’ll write a blog post containing more details on how these were found.

6 Likes

I can confirm this works for me too. I’m using an FTDI 2232-based Flyswatter2. I only tried with Telnet, not GDB yet. I didn’t see performance issues with Telnet. Will follow-up once I try GDB.

Thank you for posting. It saved me a ton of time trying to figure it out. I would definitely be interested in reading a blog post on how you all worked this out.

2 Likes

Update: Here’s the blog post: VisionFive JTAG adventures, Part 1: JH7100 GPIO -- dramforever

I originally planned to add all sorts of random stuff I found, but decided to just do a part 1 with the JTAG info first.

1 Like

文章很精彩!!!我也需要JTAG适配器,强烈期待您出个视频特辑,请您推荐或者详细介绍您用的那款JTAG适配器!

我理解的是只要 3.3V 电平的,OpenOCD 支持的 JTAG 适配器都可以。目前听说可以正常连接到 VisionFive 的包括楼上提到的 Flyswatter2,我用的树莓派 GPIO,还有一个朋友用的 USB Blaster 都可以使用,没有明显差别。因为我之前没有用过 JTAG 适配器(要不然也不会拿个树莓派来凑合),所以暂时无法推荐。

我用的就是一个树莓派 4B,用上面的 gpio 端口当成 jtag 用,参考的这两个配置文件编写:

我在树莓派上用的发行版的内核限制了 /dev/mem,所以用不了 bcm2835gpio,我就把两个配置文件里的东西组合了一下,用 linuxgpiod 驱动,但是用树莓派的端口号。JTAG 连接如下,编号是 40-pin 针的编号:

gnd 6
tck 23
tms 22
tdi 19
tdo 21
trst 26

和树莓派那个配置文件里说的一样:

# Do not forget the GND connection, pin 6 of the expansion header.
# Each of the JTAG lines need a gpio number set: tck tms tdi tdo
# Header pin numbers: 23 22 19 21
# Header pin numbers: TRST - 26
2 Likes

抱歉,我之前也没有用过 JTAG,没有这方面经验

您的提点!!!就是给了我正确的学习方向!!!感谢!!!
『只要 3.3V 电平的,OpenOCD 支持的 JTAG 适配器』
『一个树莓派 4B,用上面的 gpio 端口当成 jtag 用』

我使用sifive的openocd,为什么会提示找不到适配器呢?

Open On-Chip Debugger 0.11.0-rc1+dev (SiFive OpenOCD 0.10.0-2020.12.1)
Licensed under GNU GPL v2
For bug reports:
        https://github.com/sifive/freedom-tools/issues
Error: The specified debug interface was not found (linuxgpiod)
The following debug adapters are available:
1: ftdi
2: usb_blaster
3: jtag_vpi
4: ft232r
5: presto
6: usbprog
7: openjtag

可能 sifive 的 openocd 不支持这个功能,我用的是 GitHub - riscv/riscv-openocd: Fork of OpenOCD that has RISC-V support

另外就是这个上面的几行需要根据具体使用的 adapter 设置,我用的树莓派所以是 linuxgpiod,用别的适配器的话需要具体参考 openocd 文档设置

I’m interesting in how do you change config.tcl file in ftdi2232? I’ve tried it but it can’t recongnize the visionfive

I have noticed that TRSTN isn’t pulled up in location b, so if your adapter does not have a TRSTN output, connect the board TRSTN to 3.3V through a pull-up resistor (~10k should be fine).

请问你们有遇到这样的问题嘛?接线也检查过了

PS E:\> openocd -f .\visionfive.cfg
Open On-Chip Debugger 0.11.0-rc1+dev (SiFive OpenOCD 0.10.0-2020.12.1)
Licensed under GNU GPL v2
For bug reports:
        https://github.com/sifive/freedom-tools/issues
Info : auto-selecting first available session transport "jtag". To override use 'transport select <transport>'.
Warn : Transport "jtag" was already selected
Info : Hardware thread awareness created
Info : clock speed 3000 kHz
Info : JTAG tap: e24.cpu tap/device found: 0xffffffff (mfg: 0x7ff (<invalid>), part: 0xffff, ver: 0xf)
Warn : JTAG tap: e24.cpu       UNEXPECTED: 0xffffffff (mfg: 0x7ff (<invalid>), part: 0xffff, ver: 0xf)
Error: JTAG tap: e24.cpu  expected 1 of 1: 0x200005fd (mfg: 0x2fe (W5 Networks), part: 0x0000, ver: 0x2)
Info : JTAG tap: u74.cpu tap/device found: 0xffffffff (mfg: 0x7ff (<invalid>), part: 0xffff, ver: 0xf)
Warn : JTAG tap: u74.cpu       UNEXPECTED: 0xffffffff (mfg: 0x7ff (<invalid>), part: 0xffff, ver: 0xf)
Error: JTAG tap: u74.cpu  expected 1 of 1: 0x200003fd (mfg: 0x1fe (TeraChip), part: 0x0000, ver: 0x2)
Warn : Unexpected idcode after end of chain: 192 0xff80feff
Error: double-check your JTAG setup (interface, speed, ...)
Error: Trying to use configured scan chain anyway...
Error: e24.cpu: IR capture error; saw 0x1f not 0x01
Warn : Bypassing JTAG setup events due to errors
Error: Unsupported DTM version: 15
Warn : target e24.cpu0 examination failed
Error: Unsupported DTM version: 15
Warn : target u74.cpu0 examination failed
Error: Unsupported DTM version: 15
Warn : target u74.cpu1 examination failed
Info : starting gdb server for e24.cpu0 on 3333
Info : Listening on port 3333 for gdb connections
Info : starting gdb server for u74.cpu0 on 3334
Info : Listening on port 3334 for gdb connections
Info : Listening on port 6666 for tcl connections
Info : Listening on port 4444 for telnet connections

@titan 请问解决了吗?

Btw Segger J-link has just added support for most of Sifive cores in newest driver.

2 Likes

Here is a screenshot of Segger ozone+Jlink connects to JH7100: JTAG ports? - #6 by riturbo

sifive我用的这个配置可以进入openocd,但是巨慢(stepi 6s)https://gist.github.com/a4lg/f5109021dd5bfeb2b8bdf552c00797d2

你的adaptor用的肯定不是树莓派呀

请问一下,如果直接用jlink v11链接vf的话,要咋弄呀?

写一个连接配置脚本,我给vf2是这么写的,不知道vf1能不能用:

int InitTarget(void) {
  //
  // TDI -> TAP_#1 -> TAP_#0 -> TDO
  //
  // TAP_#0 info:
  //   Maybe E24?
  //   IRLen: 5
  //
  // TAP_#1 info:
  //   U74-MC here
  //   IRLen: 5
  //
  //
  // Code to connect to TAP_#1
  //
  JLINK_JTAG_DRPre  = 1;
  JLINK_JTAG_DRPost = 0;
  JLINK_JTAG_IRPre  = 5;
  JLINK_JTAG_IRPost = 0;
  JLINK_JTAG_IRLen  = 5;
  JLINK_SetDevice("U74-MC");
  return 0;
}

参考:

https://wiki.segger.com/J-Link_RISC-V

2 Likes