Post By: lijinlei
This project is designed for the VisionFive 2 Lite SBC to acquire SoC temperature data using the chip’s built-in temperature sensor, upload the temperature to the cloud via the MQTT protocol, and integrate it into the Home Assistant smart home platform, enabling real-time IoT monitoring of the SoC temperature.
Introduction
Acquire SoC temperature through Python programming and the chip’s internal sensor, upload it to the Home Assistant platform via the MQTT protocol, and achieve remote real-time temperature monitoring over IoT.

- Preparations: Hardware connection, Docker, HA, EMQX deployment, etc.;
- SoC Temperature: Acquiring the chip’s internal temperature and printing it to the terminal;
- MQTT Upload: Uploading the chip temperature data to the EMQX server via the MQTT protocol for remote access;
- Home Assistant Connection: Uploading the chip temperature to the HA smart home platform via the MQTT protocol.
Preparations
This section includes hardware connection, Docker installation, HA and EMQX deployment, etc.
Hardware Connection

OS Installation
Install and flash the official Ubuntu operating system for VisionFive2 Lite.
Refer to: VF2 Lite OS Installation
Docker
Install Docker on the host computer or server.

Home Assistant
Run the following command to pull the Home Assistant image via Docker:
docker pull homeassistant/home-assistant:latest
- Run the following command to start the container
docker run -d \
  --name hass \
  --restart=unless-stopped \
  -e TZ=Asia/Shanghai \
  -v /data/homeassistant/config:/config \
  --network=host \
  homeassistant/home-assistant:latest
- Access
http://<server IP>:8123/in a browser to enter the HA homepage;

- Configure user information and add the MQTT integration.
EMQX
Run the following command to pull the EMQX image via Docker:
docker pull emqx/emqx:latest
- Run the following command to start the container
docker run -d --name emqx -p 1883:1883 -p 8083:8083 -p 8084:8084 -p 8883:8883 -p 18083:18083 emqx/emqx:latest
-
Access
http://<server IP>:18083/in a browser to enter the EMQX homepage;
-
Configure account information, add clients and MQTT users.
Refer to: EMQX Adding MQTT Clients

SoC Temperature
In the VisionFive 2 Lite kernel driver, the temperature sensor is attached to the hwmon (hardware monitoring) subsystem.

Execute the following command in the terminal to find the hwmon path:
for f in /sys/class/hwmon/hwmon*/name; do
     echo "$f -> $(cat $f)"
 done
The response /sys/class/hwmon/hwmon0/name -> sfctemp
indicates the node is sfctemp , corresponding to the file path /sys/class/hwmon/hwmon0/temp1_input .
Code
Execute the command touch chip_temp.py to create a new file and add the following code:
#!/usr/bin/env python3
import time
PATH = '/sys/class/hwmon/hwmon0/temp1_input'
while True:
with open(PATH) as f:
print(f'SoC 温度: {int(f.read()) / 1000:.1f} °C')
time.sleep(1)
Save the code.
Result
Execute the command python3 chip_temp.py in the terminal.
The SoC real-time temperature data prints continuously.

MQTT Upload
Message Queuing Telemetry Transport (MQTT) is a lightweight messaging protocol based on the publish/subscribe paradigm. It is widely used in IoT, machine-to-machine (M2M) communication, smart homes, medical devices, and other fields.
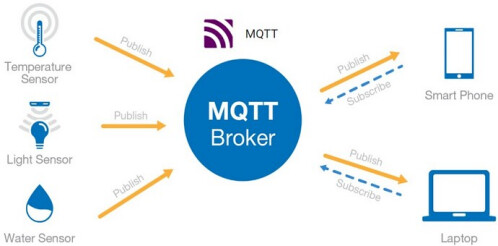
The following introduces the process of uploading the acquired chip temperature data to a cloud MQTT Broker server via the MQTT protocol.
Preparations
Run the following command to install the paho-mqtt library.
sudo apt install python3-paho-mqtt
Flowchart

Code
Execute the command touch chip_temp_mqtt.py in the terminal to create a new file and add the following code:
#!/usr/bin/env python3
import paho.mqtt.client as mqtt
import time
import json
# ---------------- 参数 ----------------
HOST = "192.168.31.116"
PORT = 1883
USER = "xxx"
PASS = "xxx"
TOPIC = "vf2/temp"
INTERVAL = 2 # 秒
TEMP_FILE = "/sys/class/hwmon/hwmon0/temp1_input"
# -----------------------------------------
def read_temp():
"""从 hwmon 读取 SoC 温度,返回浮点摄氏度"""
with open(TEMP_FILE, "r") as f:
millideg = int(f.read().strip())
return round(millideg / 1000.0, 1)
def main():
client = mqtt.Client()
client.username_pw_set(USER, PASS)
client.connect(HOST, PORT, 60)
client.loop_start()
while True:
temp = read_temp() # 温度定义
payload = json.dumps({"temperature": temp})
client.publish(TOPIC, payload)
print(payload) # 终端回显报文
time.sleep(INTERVAL)
if __name__ == "__main__":
main()
Save the code.
Result
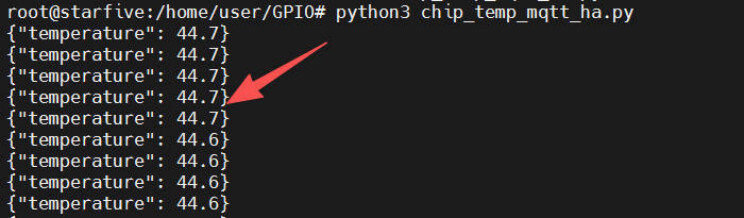
Execute python3 chip_temp_mqtt.py in the terminal to run the program.
Terminal
After the program runs, the terminal prints the JSON payload of the SoC temperature data.
Message Subscription
Access http://192.168.31.116:18083 in a browser to enter the EMQX management console.
Click the left toolbar, choose Diagnostic Tools, then choose WebSocket Client :
-
Fill in the IP address, port, username, password, and click the
Connectbutton. -
In the
Subscribepart, enter the topicvf2/temp.

- You can receive SoC temperature messages in the message box below immediately.

Home Assistant Connection
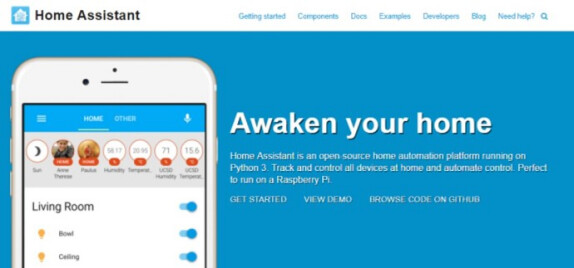
Home Assistant is an open-source smart home platform designed to provide a unified, customizable home automation solution by integrating various smart devices and services. It allows users to monitor, control, and automate various devices in their homes, including lighting, temperature, security systems, multimedia devices, etc.
The following introduces the process of uploading chip temperature data to the Home Assistant platform via the MQTT protocol, including flowcharts, code, and result demonstrations.
Flowchart

Code
Execute the command touch chip_temp_mqtt_ha.py in the terminal to create a new file and add the following code:
#!/usr/bin/env python3
import time, json, os
import paho.mqtt.client as mqtt
# ----------- 可调参数 -----------
MQTT_HOST = "192.168.31.116"
MQTT_PORT = 1883
MQTT_USER = "xxx"
MQTT_PASS = "xxx"
CLIENT_ID = "vf2lite-temp"
DISCOVERY_PREFIX = "homeassistant" # HA 默认发现前缀
NODE_ID = "visionfive2lite" # 设备层节点 ID
OBJECT_ID = "soc_temp" # 实体层对象 ID
TEMP_PATH = "/sys/class/hwmon/hwmon0/temp1_input"
SEND_INTERVAL = 2 # 秒
# -----------------------------------
STATE_TOPIC = f"{DISCOVERY_PREFIX}/sensor/{NODE_ID}/{OBJECT_ID}/state"
CONFIG_TOPIC = f"{DISCOVERY_PREFIX}/sensor/{NODE_ID}/{OBJECT_ID}/config"
def read_temp():
with open(TEMP_PATH) as f:
return round(int(f.read()) / 1000, 1)
def on_connect(cli, _ud, _flags, rc):
if rc == 0:
print("MQTT 已连接")
# 发送自动发现配置
config = {
"name": "SoC 温度",
"state_topic": STATE_TOPIC,
"unit_of_measurement": "°C",
"device_class": "temperature",
"value_template": "{{ value_json.temperature }}",
"unique_id": f"{NODE_ID}_{OBJECT_ID}",
"device": {
"identifiers": [NODE_ID],
"name": "VisionFive2 Lite",
"model": "VisionFive2 Lite",
"manufacturer": "StarFive"
}
}
cli.publish(CONFIG_TOPIC, json.dumps(config), retain=True)
else:
print(f"MQTT 连接失败,返回码 {rc}")
def main():
client = mqtt.Client(client_id=CLIENT_ID)
client.username_pw_set(MQTT_USER, MQTT_PASS)
client.on_connect = on_connect
client.connect(MQTT_HOST, MQTT_PORT, keepalive=60)
client.loop_start()
while True:
try:
temp = read_temp()
payload = json.dumps({"temperature": temp})
client.publish(STATE_TOPIC, payload, qos=1)
print(f"已推送温度: {temp} °C")
except Exception as e:
print("读取/推送失败:", e)
time.sleep(SEND_INTERVAL)
if __name__ == "__main__":
main()
Save the code.
Result
Execute python3 chip_temp_mqtt_ha.py in the terminal to run the program.
Terminal
- After the program runs, the terminal prints temperature data and real-time message push status.

Card
-
Enter the Home Assistant main interface.
-
The target device is automatically loaded, displaying real-time SoC temperature information.

History Graph
-
Click on the card to further access the historical evolution graph.
-
In the “Show More” link, you can adjust the time period to view more details.

Additionally, you can access the Home Assistant mobile APP to obtain real-time chip temperature information.
Summary
This project introduced the design for the VisionFive2 Lite SBC to acquire SoC temperature data using the chip’s built-in temperature sensor, upload the temperature to the cloud via the MQTT protocol, and integrate it into the Home Assistant smart home platform, enabling real-time IoT monitoring of the SoC temperature. This provides a reference for the rapid development and product application in fields such as Industrial IoT, smart homes, and consumer electronics.