1. Make the tftp server for prebuilt u-boot files.
(1) Download the prebuilt u-boot package Ubuntu provided.
https://launchpad.net/~ubuntu-risc-v-team/+archive/ubuntu/release/+packages
$ wget -O u-boot-starfive.deb https://launchpad.net/~ubuntu-risc-v-team/+archive/ubuntu/release/+files/u-boot-starfive_2024.01~rc4-0ubuntu1~ppa1_riscv64.deb
(2) Extract it:
$ dpkg -x u-boot-starfive.deb u-boot-starfive
(3) Install tftp server:
$ sudo apt-get update
$ sudo apt install tftpd*
$ cat /etc/default/tftpd-hpa
# /etc/default/tftpd-hpa

TFTP_USERNAME="tftp"
TFTP_DIRECTORY="/srv/tftp"
TFTP_ADDRESS=":69"
TFTP_OPTIONS="--secure"
(4) Copy the u-boot files we just extracted to /srv/tftp:
$ sudo cp u-boot-starfive/usr/lib/u-boot/starfive_visionfive2/u-boot* /srv/tftp/
Restart tftp server:
$ sudo systemctl restart tftpd-hpa
2. Update SPL and U-Boot.
(1) Connect the cable to your VF2, change the Boot Mode to 1-bit QSPI Nor Flash and power it on:
Make sure the Router connected to VF2 is the one your host is connecting to.
(2) Set IP addresses of VF2 and your host(tftp server), you need to connect VF2 to your Host:
$ sudo picocom -b 115200 /dev/ttyUSB0
# or sudo minicom -D /dev/ttyUSB0 -b 115200
StarFive # setenv ipaddr 192.168.120.222; setenv serverip 192.168.120.99
Change 192.168.120.222 to the IP address your router can assign, change 192.168.120.99 to the IP address your host actually uses.
e.g.:
$ ifconfig -a | grep inet
        inet 127.0.0.1  netmask 255.0.0.0
        inet6 ::1  prefixlen 128  scopeid 0x10<host>
        inet 192.168.31.9  netmask 255.255.255.0  broadcast 192.168.31.255
        inet6 fe80::7340:9471:5805:a811  prefixlen 64  scopeid 0x20<link>
the IP address of my Host is 192.168.31.9, my router address space range is: 192.168.31.0 ~ 192.168.31.255, just choose one for VF2:
# You have to enter these commands by yourself maybe,
# I have tried 'copy-and-paste' but they aren't recognized
# correctly under picocom.
StarFive # setenv ipaddr 192.168.31.222; setenv serverip 192.168.31.9
(3) Update binary.
StarFive # ping ip.of.your.host
If they are connected, then you are half successful:
host ip.of.you.host is alive
Update:
StarFive # sf probe
StarFive # tftpboot 0xa0000000 ${serverip}:u-boot-spl.bin.normal.out
StarFive # sf update 0xa0000000 0x0 $filesize

StarFive # tftpboot 0xa0000000 ${serverip}:u-boot.itb
StarFive # sf update 0xa0000000 0x100000 $filesize
3. Flash Ubuntu Server image to SD-Card .
Reference link:
https://wiki.ubuntu.com/RISC-V/StarFive%20VisionFive%202
$ wget -O ubuntu-23.10-live-server-riscv64.img.gz https://cdimage.ubuntu.com/releases/23.10/release/ubuntu-23.10-live-server-riscv64.img.gz
$ # 📌 Be careful, `sdX` is the device name of your SD card.📌
$ zcat ubuntu-23.10-live-server-riscv64.img.gz | sudo dd of=/dev/sdX bs=1G conv=fsync status=progress
4. Install Ubuntu Server into NVMe SSD.
Reference link:
(1) Insert NVMe SSD and SD-Card into VF2 and boot SD-Card on VF2.
StarFive # load mmc 1:1 $fdt_addr_r dtb/starfive/jh7110-starfive-visionfive-2-v1.3b.dtb
StarFive # load mmc 1:1 $kernel_addr_r EFI/boot/bootriscv64.efi
StarFive # bootefi $kernel_addr_r $fdt_addr_r
Then, select the NVMe SSD for Ubuntu Server.
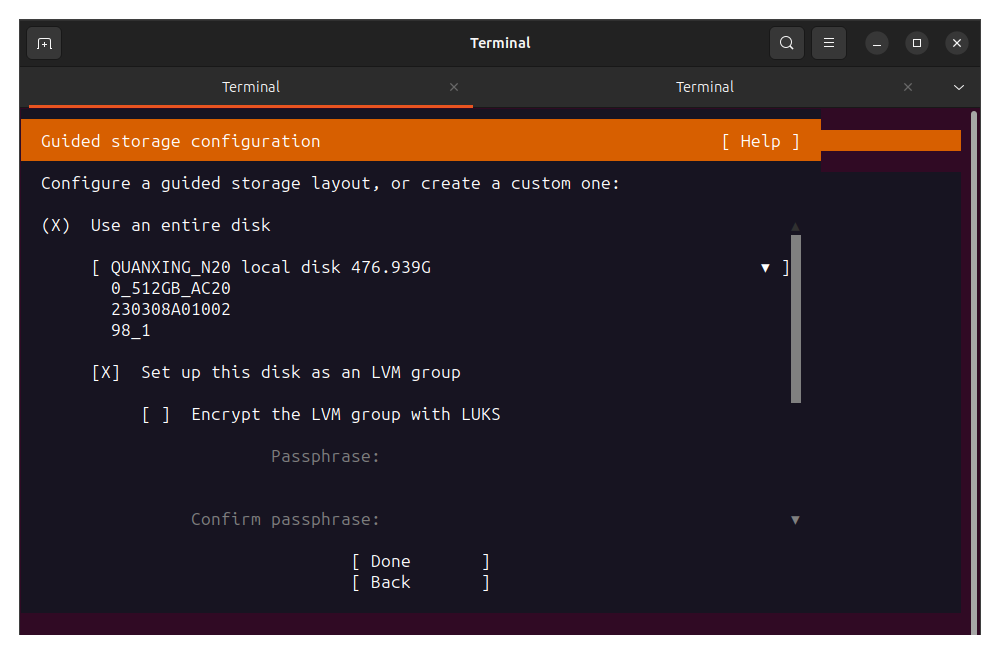
Reboot after installation is complete.
(2) Set default boot device to NVMe.
Hit any key to interrupt normal startup when you see:
Hit any key to stop autoboot: 2
Set environment variables and save:
StarFive # env default -f -a
StarFive # saveenv
StarFive # setenv bootcmd_nvme0 "pci enum; nvme scan; efidebug boot add -b 0001 'Ubuntu' nvme 0:1 /EFI/ubuntu/grubriscv64.efi; efidebug boot order 0001; bootefi bootmgr"
StarFive # setenv bootcmd 'run bootcmd_nvme0'
StarFive # saveenv
Press the Reset Button and wait for booting.
5. For v1.2A.
You have to update grub on VF2 if the version of your VF2 is v1.2A:
$ echo 'StarFive VisionFive 2 v1.2A' | sudo tee /etc/flash-kernel/machine
$ sudo flash-kernel $(uname -r)
$ sudo update-grub
$ sudo reboot
6. Resize /dev/nvme0n1p3 partition of VF2.
Reference link:
$ sudo fdisk -l
***
Device           Start       End   Sectors   Size Type
/dev/nvme0n1p1    2048   2203647   2201600     1G EFI System
/dev/nvme0n1p2 2203648   6397951   4194304     2G Linux filesystem
/dev/nvme0n1p3 6397952 976773134 970375183 462.7G Linux filesystem
***

$ sudo parted /dev/nvme0n1
(parted) resizepart
Partition number? 3
End?  [53.7GB]? 100%
(parted) quit

$ sudo pvresize /dev/nvme0n1p3
$ sudo lvextend -l +100%FREE /dev/mapper/ubuntu--vg-ubuntu--lv
$ sudo resize2fs /dev/mapper/ubuntu--vg-ubuntu--lv
$ df -h