Experience VisionFive v2 day01
All of the following may damage your device or delete your data. Please proceed with caution.
1. Download the img and flash it to Micro-SD Card.
Download the starfive-jh7110-VF2-SD-wayland.img.bz2 from debian.starfivetech.com and unzip it via bunzip2, copy it to Micro-SD Card:
larry@zx0:~/Downloads$ bunzip2 starfive-jh7110-VF2-SD-wayland.img.bz2
# Be careful! the `/dev/sdb` is my Micro-SD Card device, your may be different.
larry@zx0:~/Downloads$ sudo dd if=starfive-jh7110-VF2-SD-wayland.img  of=/dev/sdb     status=progress
2827981312 bytes (2.8 GB, 2.6 GiB) copied, 684 s, 4.1 MB/s
5529600+0 records in
5529600+0 records out
2831155200 bytes (2.8 GB, 2.6 GiB) copied, 684.487 s, 4.1 MB/s
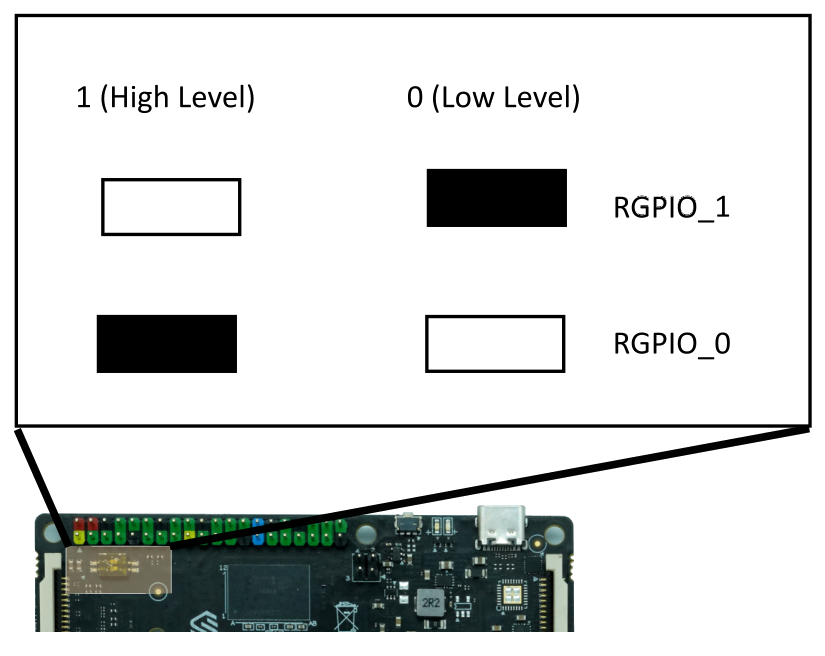
and then, insert the Micro-SD Card to VisionFive v2 and boot it, the Boot Mode is set to:
2. Connect to the network.
Now, you could log in your VisionFive v2 via this tutorial for a few minutes:
Username: user
Password: starfive
And connect to the network. For me, I use the USB wifi dongle to connect the Hotspot:
user@starfive:~$ sudo nmcli device wifi connect your-wifi-name password your-wifi-password
Device '******' successfully activated with '******'.
3. Extend the /dev/mmcblk1.
By default, the Debian Image 202303 doesn’t add /sbin to PATH for common users, you may add it to PATH by yourself or fdisk will NOT be found.
user@starfive:~$ export PATH=$PATH:/sbin
user@starfive:~$ which fdisk
/sbin/fdisk
Visit this Manual and extend the /dev/mmcblk1:
user@starfive:~$ sudo fdisk /dev/mmcblk1

Welcome to fdisk (util-linux 2.38.1).
Changes will remain in memory only, until you decide to write them.
Be careful before using the write command.

GPT PMBR size mismatch (4505599 != 62929919) will be corrected by write.
This disk is currently in use - repartitioning is probably a bad idea.
It''s recommended to umount all file systems, and swapoff all swap
partitions on this disk.
Command (m for help): d
Partition number (1-4, default 4): 4

Partition 4 has been deleted.

Command (m for help): n
Partition number (4-128, default 4): 4
First sector (34-62929886, default 221184):
Last sector, +/-sectors or +/-size{K,M,G,T,P} (221184-62929886, default 62928895):

Created a new partition 4 of type 'Linux filesystem' and of size 29.9 GiB.
Partition #4 contains a ext4 signature.

Do you want to remove the signature? [Y]es/[N]o: N

Command (m for help): w

The partition table has been altered.
Syncing disks.
user@starfive:~$:sudo resize2fs /dev/mmcblk1p4
resize2fs 1.46.6[ 1080.736178] EXT4-fs (mmcblk1p4): resizing filesystem from 663291 to 6061747
2 blocks
-rc1 (12-Sep-2022)
Filesystem at /dev/mmcblk1p4 is mounted on /; on-line resizing required
old_desc_blocks = 1, new_desc_blocks = 29
[ 1083.041985] EXT4-fs (mmcblk1p4): resized filesystem to 60617472
The filesystem on /dev/mmcblk1p4 is now 60617472 (4k) blocks long.
After these operations, the /dev/mmcblk1p4 was extended:
user@starfive:~$ df -mh
Filesystem      Size  Used Avail Use% Mounted on
udev            3.7G     0  3.7G   0% /dev
tmpfs           793M  3.2M  790M   1% /run
/dev/mmcblk1p4  228G  2.5G  226G   2% /
tmpfs           3.9G     0  3.9G   0% /dev/shm
tmpfs           5.0M   12K  5.0M   1% /run/lock
/dev/mmcblk1p3  100M   23M   78M  23% /boot
tmpfs           793M   36K  793M   1% /run/user/110
tmpfs           793M   24K  793M   1% /run/user/1000
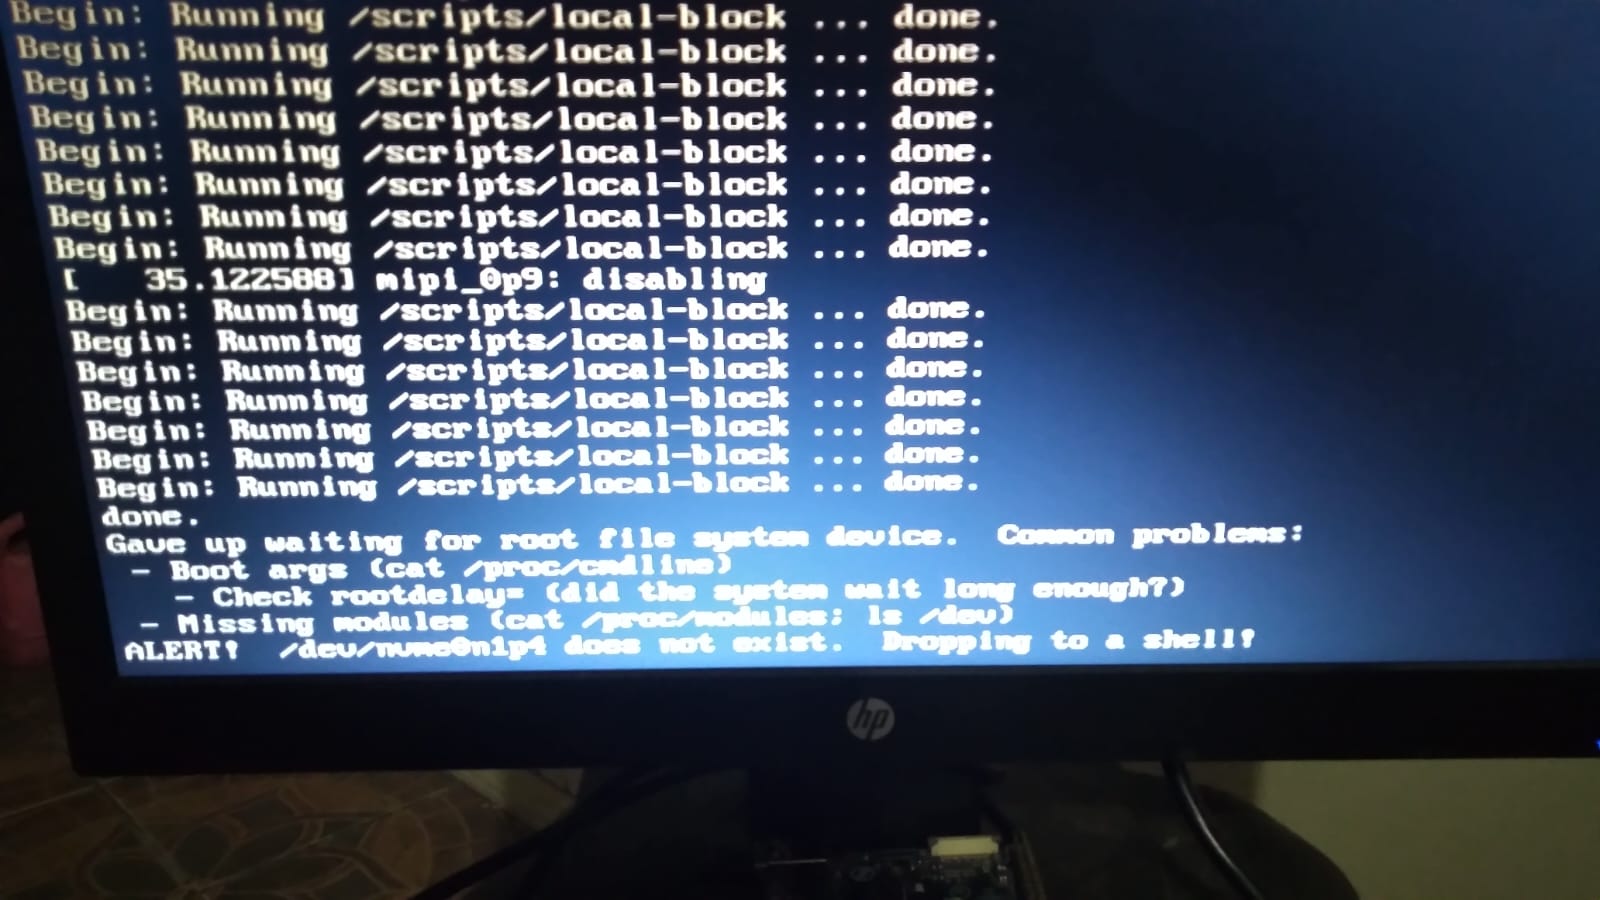
4. Now, let’s try booting from NVME.
Note: It seems that the NVME may not be detected if the power is not greater than 15 watts.
scp the starfive-jh7110-VF2-SD-wayland.img to VisionFive v2 and copy it to NVME:
# Pay attention to my host-names, they are different hosts.

user@starfive:~$ mkdir Downloads

larry@zx0:~/Downloads$ scp starfive-jh7110-VF2-SD-wayland.img  user@starfive.local:~/Downloads
The authenticity of host 'starfive.local (192.168.31.242)' can't be established.
ED25519 key fingerprint is SHA256:*******************.
This key is not known by any other names
Are you sure you want to continue connecting (yes/no/[fingerprint])? yes
Warning: Permanently added 'starfive.local' (ED25519) to the list of known hosts.
user@starfive.local's password:
starfive-jh7110-VF2-SD-wayland.img                          100% 2700MB   3.2MB/s   13:54

user@starfive:~/Downloads$ sudo dd if=starfive-jh7110-VF2-SD-wayland.img of=/dev/nvme0n1  status=progress
2816003072 bytes (2.8 GB, 2.6 GiB) copied, 226 s, 12.5 MB/s
5529600+0 records in
5529600+0 records out
2831155200 bytes (2.8 GB, 2.6 GiB) copied, 230.018 s, 12.3 MB/s
Now, let’s Change SD card’s rootfs UUID (Reference from https://jamesachambers.com/starfive-visionfive-2-debian-ssd-boot-guide/):
user@starfive:~/Downloads$ sudo tune2fs -U random /dev/mmcblk1p4
tune2fs 1.46.6-rc1 (12-Sep-2022)
Setting the UUID on this filesystem could take some time.
Proceed anyway (or wait 5 seconds to proceed) ? (y,N) <proceeding>
The UUID may only be changed when the filesystem is unmounted.
If you only use kernels newer than v4.4, run 'tune2fs -O metadata_csum_seed' and re-run this command.
Modify the /boot/extlinux/extlinux.conf:
user@starfive:~/Downloads$ cat /boot/extlinux/extlinux.conf > extlinux.conf.202304152100.cp
user@starfive:~/Downloads$ sudo sed -i 's/mmcblk1p4/nvme0n1p4/g' /boot/extlinux/extlinux.conf
user@starfive:~/Downloads$ cat /boot/extlinux/extlinux.conf
## /extlinux/extlinux.conf
##
## IMPORTANT WARNING
##
## The configuration of this file is generated automatically.
## Do not edit this file manually, use: u-boot-update

default l0
menu title U-Boot menu
prompt 0
timeout 50


label l0
        menu label Debian GNU/Linux bookworm/sid 5.15.0-starfive
        linux /vmlinuz-5.15.0-starfive
        initrd /initrd.img-5.15.0-starfive


        fdtdir /dtbs
        append root=/dev/nvme0n1p4 root=/dev/nvme0n1p4 rw console=tty0 console=ttyS0,115200 earlycon rootwait stmmaceth=chain_mode:1 selinux=0

label l0r
        menu label Debian GNU/Linux bookworm/sid 5.15.0-starfive (rescue target)
        linux /vmlinuz-5.15.0-starfive
        initrd /initrd.img-5.15.0-starfive

        fdtdir /dtbs
        append root=/dev/nvme0n1p4 root=/dev/nvme0n1p4 rw console=tty0 console=ttyS0,115200 earlycon rootwait stmmaceth=chain_mode:1 selinux=0 single
OK, try to reboot your VisioinFive v2:
user@starfive:~/Downloads$ sudo reboot
If it could be booted normally, congratulations!
user@starfive:~$ df -mh
Filesystem      Size  Used Avail Use% Mounted on
udev            3.7G     0  3.7G   0% /dev
tmpfs           793M  3.2M  790M   1% /run
/dev/nvme0n1p4  2.5G  2.4G   28M  99% /
tmpfs           3.9G     0  3.9G   0% /dev/shm
tmpfs           5.0M   12K  5.0M   1% /run/lock
/dev/mmcblk1p3  100M   23M   78M  23% /boot
tmpfs           793M   36K  793M   1% /run/user/110
tmpfs           793M   24K  793M   1% /run/user/1000
Now, just repeat Step2 and Step3 again. (The device you need to extend may should be /dev/nvme0n1p4.)
5. Use the Debian-ports mirror.
The debian-ports mirrors I found are following:
- https://mirrors.aliyun.com/debian-ports
- http://mirror.lzu.edu.cn/debian-ports
- http://mirror.nju.edu.cn/debian-ports
- https://mirror.sjtu.edu.cn/debian-ports
- https://mirror.iscas.ac.cn/debian-ports
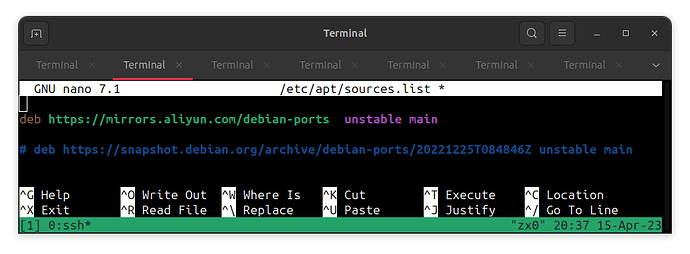
May it’s helpful for y’all. Modify the /etc/apt/sources.list:
deb https://mirrors.aliyun.com/debian-ports unstable main
Add the apt-key(Packages authentication):
wget -O - https://www.ports.debian.org/archive_2023.key | sudo apt-key add -
6 Upgrade firmware to v3.0.4
The latest firmware for May was released, and the /boot partition doesn’t need to be mounted at /dev/mmcblk1p3 now. Feel free to upgrade it:
wget -O upgrade-firmware.sh https://raw.githubusercontent.com/larryw3i/VisionFive2/JH7110_VisionFive2_devel/upgrade-firmware.sh && sudo bash upgrade-firmware.sh
and edit /etc/fstab:
# <file system> <mount point>   <type>  <options>       <dump>  <pass>
# /dev/mmcblk1p3       /boot       vfat    defaults       0 2
/dev/nvme0n1p3       /boot       vfat    defaults       0 2
# /dev/mmcblk1p4       /       ext4    errors=remount-ro       0 1
/dev/nvme0n1p4       /       ext4    errors=remount-ro       0 1
(Of course, these are all operated on installed Debian system. )
mount /dev/nvme0n1p3 and modify extlinux.conf:
$ mkdir nvme0n1p3
$ sudo mount /dev/nvme0n1p3 nvme0n1p3/
# cp the extlinux.conf of mmcblk1p3 to nvme0n1p3
$ sudo cp /boot/extlinux/extlinux.conf nvme0n1p3/extlinux/
# or
# $ sudo sed -i 's/mmcblk1p4/nvme0n1p4/g' nvme0n1p3/boot/extlinux/extlinux.conf
$ sudo umount nvme0n1p3
$ rm -rf nvme0n1p3/
extlinux.conf (1.4 KB)
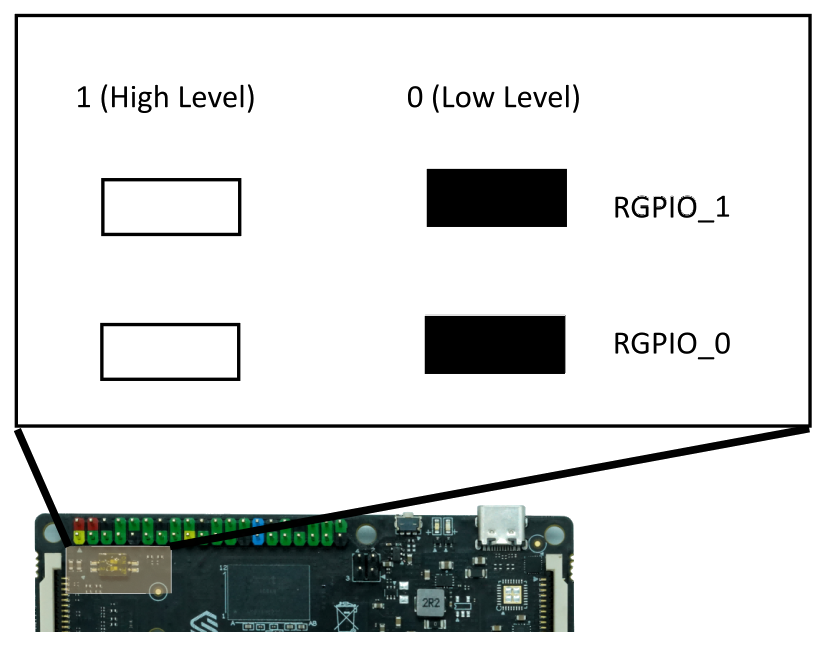
now unplug the Micro-SD card, and change the Boot Mode to 1-bit QSPI Nor Flash:
Trigger the
Reset key and wait for a moment, VF2 will boot from NVMe directly and it works well.