Create Debian System image on RISC-V VisionFive

Thanks to Houge for this contribution.

Part 1 Compile and package the kernel, create deb sources
It is especially important to create a RISC-V core for StarFive VisionFive, The complete process is as follows.

#Debian or Ubuntu

#Debian Install dependencies:
apt install libncurses-dev libssl-dev bc flex bison gcc-riscv64-linux-gnu build-essential ccache cpio fakeroot flex git kmod libelf-dev libncurses5-dev libssl-dev lz4 qtbase5-dev rsync schedtool wget zstd pahole dwarves -y

#Ubuntu Install dependencies:
apt install libncurses-dev libssl-dev bc flex bison gcc-riscv64-linux-gnu build-essential ccache cpio fakeroot flex git kmod libelf-dev libncurses5-dev libssl-dev lz4 qtbase5-dev rsync schedtool wget zstd dwarves -y

# Download the source code:
#download link: https://github.com/starfive-tech/linux
mkdir -p linux-build
# Create compiling directory

cd linux-build
# Enter the directory

wget https://github.com/starfive-tech/linux/archive/54fad564dc7a117704e99248c3984f907e1867d5.tar.gz
# Download the specific kernel source code according to the latest commits

tar -xpvf 54fad564dc7a117704e99248c3984f907e1867d5.tar.gz
# Unzip the source code

mv linux-54fad564dc7a117704e99248c3984f907e1867d5 linux-5.17.0-rc5
# Create a simple name for the unzipped source directory

cd linux-5.17.0-rc5
# Enter the directory

cp arch/riscv/configs/starfive_jh7100_fedora_defconfig .config
# Copy the kernel configuration file to the root directory of the kernel source and name it .config

make ARCH=riscv CROSS_COMPILE=riscv64-linux-gnu- menuconfig
# Use cross-compiler to configure the kernel

make ARCH=riscv CROSS_COMPILE=riscv64-linux-gnu- -jX bindeb-pkg LOCALVERSION=-starfive-xxx
#Use -jX all threads, and finally take a name you like

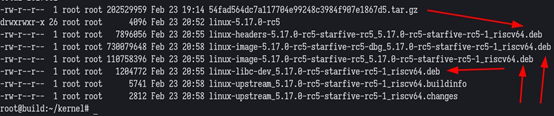
# After the compilation is completed, 4 deb files will be generated in the upper directory, similar to the following figure:

图片

Let’s see how to build with Arch:

Archlinux or other distributions can be created in a similar way

Here are some little tricks about the file system:

When you use the btrfs filesystem, you can create a subvolume in the /mnt/ directory. If you compile it under a subvolume, you can take a snapshot later and make a backup;

When you use the zfs file system, it is recommended to use the zvol block device and format it as an ext4 file system, mount it in the /mnt/xxx/ directory and build and package it. Because doing so facilitates backup, cloning and rapid deployment.

# The following operations are performed with root privileges by default

pacman -S yay # install my favorite yay
pacman -S paru # install your favorite yay

# Choose one of the above operations

yay -S debootstrap debian-archive-keyring ubuntu-keyring
# Install some important tools in Debian system. debootstrap can install the base system of various architectures to the specified directory. keyring can provide a key to verify that the deb package has not been tampered with.

debootstrap unstable /mnt/xxx https://mirror.sjtu.edu.cn/debian/
# Download the latest debian sid base system from the Shanghai Jiaotong University Debian mirror source and install it to the /mnt/xxx directory
debootstrap impish /mnt/xxx https://mirror.sjtu.edu.cn/ubuntu/
# Download the latest ubuntu 21.10 base system from the Shanghai Jiaotong University ubuntu mirror source and install it to the /mnt/xxx directory

systemd-nspawn -D /mnt/xxx/ -M kernel --bind-ro=/etc/resolv.conf
# Use systemd-nspawn to create a debian/ubuntu x86_64 base system container named kernel

# Follow-up operations can refer to the operations of Debian and Ubuntu above. After completion, you need to remember the location of the packaged deb package. You may need to use root privileges to copy these debs to a directory that is convenient for you to wait for the next step.

Complete the kernel compilation and packaging, don’t be too happy.

Note that copy the dtb file of StarFive VisionFive in the kernel source directory to a directory you remember. The directory where this dtb is located is /arch/riscv/boot/dts/starfive/.

Continuing below, there are two methods of operation for installing the kernel deb, and I recommend the second one. The first one is simple, but not true, that is to copy the compiled and packaged risc-v kernel to the future system and install it directly. The command is: dpkg -i xxx.deb. I prefer to call the the second method “fundamentalism” of the Debian /Ubuntu installation software that is to set up our private RISC-V deb source. The advantage of this is that your friends can install the kernel you made according to the tradition of Debian/Ubuntu, and can maintain this kernel version to facilitate their subsequent updates. Let’s talk about setting up a Deb source.

Choose the right server:

In the company, you can create a virtual machine of Ubuntu on the NAS, and then map the network to your company LAN so that everyone can access it normally.

For a personal user like me, I choose a cloud and build an Ubuntu VPS as the deb source server. Just start working on your VPS.

apt install reprepro --yes
# Install reprepro, deb

ln -sf /usr/share/zoneinfo/Asia/Shanghai /etc/localtime 
hwclock --systohc
apt install ntpdate
ntpdate -s time.nist.gov
# The purpose of the above operations is to synchronize the time of the VPS or virtual machine to the standard Beijing time to prevent the time from mismatching and the inability to install and update software

gpg --gen-key
# Generate your key. Subsequent deb packages will be signed with this private key. Other machines need to download your public key for verification.

图片

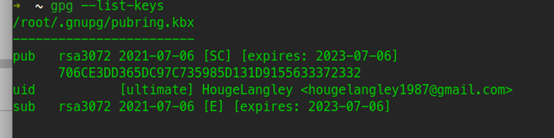
The above picture is the generated key, which can be displayed with gpg --list-keys. Pay attention to the long string of characters: 706CE3DD…, write down the last 8 digits: 33372332, they are important, don’t ask me how I know :rofl:

apt install apache2 -y
# Install a web server that you can operate, I am more used to apache

Create a directory under the web server directory as follows:

mkdir -p /var/www/html/ubuntu-impish
cd /var/www/html/ubuntu-impish
mkdir -p conf db dists pool
touch conf/distributions
#distributions file
touch conf/options
#options of description

# Note that ubuntu-impish is a name. You can choose whatever name you like, and you can freely handle it according to your needs.

Let’s configure distributions:

Origin: ubuntu
Suite: impish
Label: ubuntu
Codename: impish
Architectures: riscv64
Components: main
Description: Apt repository for StarFive VisionFive V1
SignWith: 33372332

Let me explain the above:

• If your origin is Debian, write Debian, if it is Ubuntu, write Ubuntu
• Write Suite as the codename of your distribution
• Label is similar to Origin
• Codename is just a release codename
• About components, because we only meet the use of a small range of friends, main is enough, if strict maintenance is required, it is best to classify in detail
• The description part is free for everyone
• SignWith is the place to sign, remember that 8 bit key of yours?

Let’s export our public key to the source directory:

# Reemphasize that 8-bit key
gpg --export --armor 33372332 > /var/www/html/ubuntu-impish/gpg-public.key

图片

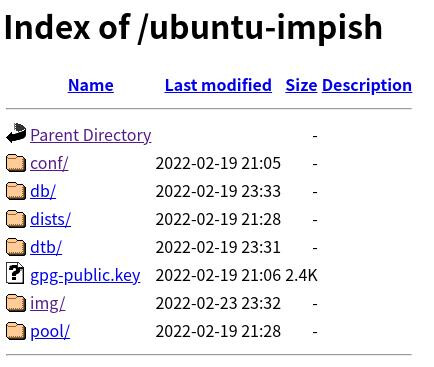
The picture above is the general appearance after creation.

Now you can publish or revoke the kernel deb package you created:

reprepro -b /var/www/html/ubuntu-impish -C main includedeb impish/< The deb directory you compiled and packaged earlier >/*.deb
# This is to publish your deb package, then a TUI will pop up, where you enter the password (the password you entered when gpg created the key pair)

reprepro -b /var/www/html/ubuntu-impish -C main remove impish < deb package name >
# Remove or undo deb packages from the repository

If all goes well, your private deb repository is created. Take care of it~

Summary of the first part:

Cross-compilation is recommended for kernel compilation and packaging, which is fast

Remember to copy the dtb out to facilitate final processing

It is strongly recommended to use the traditional setup source server to manage the built deb packages

4 Likes

Part 2: Create block devices and partitions and create a RISC-V Debian base system

Now, regardless of any distribution, it is very convenient to install the out-of-tree kernel module of zfs. The following is my own habit to create a block device. If you don’t use the zfs file system, it doesn’t matter, use losetup to create an .img file, which is the same as a block device. Although zfs is more “scientific” :laughing:

# The following contents are operated with root privileges:
zfs create -V 10G root/Container/starfive-lxde
# Under root/Container/pool, create a block device named starfive-lxde with a size of 10G (10G is enough for Debian/Ubuntu, but not enough for Gentoo, Gentoo needs 120G)

cfdisk -z /dev/zvol/root/Container/starfive-lxde
# Divide the block device, and the partition looks like the following figure:

图片

Format the three partitions above:

• Note that the first partition is an empty partition;
• The second partition, formatted as vfat, does not need to take the label name;
• The third partition is formatted as ext4, and the label is named: _/boot;
• The fourth partition is formatted as ext4, and the label is named: _/;

Create a directory under the /mnt directory, which I call here: Starfive, ie /mnt/Starfive

Start a series of operations to mount the block device to the directory /mnt/Starfive

mount -t ext4 /dev/zvol/root/Container/starfive-lxde-part4 /mnt/Starfive
mkdir -p /mnt/Starfive/boot
mount -t ext4 /dev/zvol/root/Container/starfive-lxde-part3 /mnt/Starfive/boot
mkdir -p /mnt/Starfive/boot/efi
mount -t vfat /dev/zvol/root/Container/starfive-lxde-part2 /mnt/Starfive/boot/efi

After the mount is complete, you can run lsblk to view the structure similar to the following figure:

Use debootstrap to install the RISC-V Debian base system to /mnt/Starfive:

debootstrap –arch=riscv64 –keyring /usr/share/keyrings/Debian-ports-archive-keyring.gpg –include=Debian-ports-archive-keyring unstable /mnt/Starfive https://deb.debian.org/Debian-ports/

Explaination:

• – arch=riscv64 emphasizes the architecture is riscv64;
• – keyring needs everyone to download a deb package separately. I don’t remember whether it is included in the source code of debian / ubuntu. If it is not included, you can download this package. After downloading and unzipping the deb, extract the debian-ports-archive-keyring.gpg file. I put the file in this directory
• – include adds a specific package in base system, the debian-ports-archive-keyring package is a key package, we need to add it to avoid any trouble if the key is missing in the future
• At present, the RISC-V architecture is not supported by the stable version of Debian. For example, the current Debian stable version is Debian 11, which does not support RISC-V, so we can only use the unstable version Sid/Unstable. Some websites state that RISC-V is in stable branch, that’s propaganda, not real.
• /mnt/Starfive is the directory, now the block device has been mounted
Index of /debian-ports is the address to download the deb package (this is the official source, it is recommended not to use mirror, occasionally due to synchronization problems, there will be file verification mismatches)

According to your network speed, complete the deployment of the base system.

Summary of the second part

• Create block devices in the way you are used to;
• Get used to backing up to avoid duplication of work and save time;
• master the command of debootstrap, you can look at the output of help.

More you try, fewer mistakes.

2 Likes

Part 3: Improve the basic system, prepare necessary files under /boot directory , and prepare for the final startup of the development board

Debian/Ubuntu creates RISC-V simulation environment

#The following content is done under root

apt install qemu-user-static binfmt-support -y
#Install qemu binfmt to create a simulation environment

Archlinux or other distribution to create a RISC-V simulation environment

Please refer to Archlinux wiki, I will not make a move.

Then we can directly use systemd-nspawn to enter the container and start subsequent operations.

#The following content is completed under root

systemd-nspawn -D /mnt/Starfive -M starfive --bind-ro=/etc/resolv.conf
#Start a Debian RISC-V container named starfive whose root directory is /mnt/Starfive.

apt update; apt dist-upgrade -y
#update system

apt install curl gnupg2 gnupg vim nano initramfs-tools -y
#Install the necessary tools and editors to prepare for the generation of the initramfs image.
curl -s http://<address of kernel private source>/xxx/gpg-public.key | apt-key add -
#Add the public key of the kernel's private source to apt-key. I remember that ubuntu and debian are slightly different here. You can search for the method according to different distributions.

deb http://<address of private kernel source>/xxx unstable main
#Add the address of the private source to /etc/apt/sources.list
apt update; apt install <the name of the kernel in your private source, remember to install linux-headers linux-image>
#Flash the source, install the private source kernel

At this point your /boot directory should look like this:
图片

You can download the necessary files from the earliest created Fedora image from here. You may ask, why can’t Debian/Ubuntu be created according to your own distribution? In fact, the reason is determined by the configuration file read by the uboot of the development board and the current .efi file, we can just follow the steps.

Next, we need to copy the files in the original Fedora image to the /boot directory of Debian/Ubuntu, and make appropriate modifications.

Copy the boot folder (which you will see after unzipping the downloaded zip file) to the Debian/Ubuntu /boot directory.

Currently there is a boot folder in the /boot, which contains a file called uEnv.txt. You can open it with a common editor and change Fedora to Debian. Similar to the following two pictures:
图片
图片

After the completion, let’s copy the EFI folder (you can see it in the compressed package), copy the EFI folder completely to the Debian/Ubuntu /boot/efi/ directory, you can delete fedora in the EFI folder, of course It is also possible to keep it, as a backup.

Copy the dtb generated by the part of the compiled kernel to your Debian/Ubuntu /boot/ directory.

Also copy the extlinux directory and grub.cfg to /boot. Use an editor to modify the configuration file and grub.cfg in extlinux. The modified content includes the vmlinuz file name corresponding to the kernel, the dtb file corresponding to fdt, the initramfs image corresponding to initd, the UUID value, you can reopen a terminal sudo lsblk to view the UUID of the root directory, copy and paste it. It might look like this in the end:
图片
图片
图片

Finally, don’t forget to look at the /boot directory with ls -l and check the tree again (install it with apt if there is no tree).It feels like we have complete the process, don’t forget the final touches:

passwd root
#Create a password for root

sync
#Sync file system, write cache

exit
# exit the container

umount /dev/zvol/root/Container/starfive-lxde-*
#Unmount the mounted block device

dd if=/dev/zvol/root/Container/starfive-lxde of=/dev/<your sdcard> status=progress bs=1M
#Burn the finished block device to your sdcard, pay attention to determine your block device here, don't write it wrong

Summary of the third part:

Depending on the mirror distribution you make, the public key that Debian and Ubuntu import into your private kernel source will be slightly different. Check Google according to the situation you encounter.

Step by step, check more details

2 Likes

Video Guideline:

2 Likes

Thanks for this contribution :smiling_face_with_three_hearts:. @Houge_Langley do you have some details on necessary steps you do after the image creation - or actually before you quit the container - like creating fstab, installation of some basic packages like network-manager, linux-firmware etc?

Or in general which packages you usually install.
Once the SBC booted with proper network I’ve simply piped the manifest file https://releases.ubuntu.com/22.04/ubuntu-22.04-live-server-amd64.manifest into apt (remove some amd64 specifics ones and some which have no riscv64 installation candidate) but there are a lot of packages which I usually don’t need.

Thank you :slight_smile:

Oh, sorry for my delay. :stuck_out_tongue_closed_eyes:

@mackenzy Yes, I have been install some packages I think is necessary. For example:

apt install git curl openssh-client openssh-server network-manager initramfs-tools vim firmware-linux-free task-lxde-desktop neofetch -y

These are good for me to test running DE on StarFive board.

1 Like

Great, thank you. I’m running my SBC only in headless mode so I don’t install any DE.
Looks similar to what I’ve installed today during my first few dry-runs :+1: