According to StarFive, developers have successfully used fire alarm devices on VisionFive/VisionFive 2, and the specific instructions are as follows:
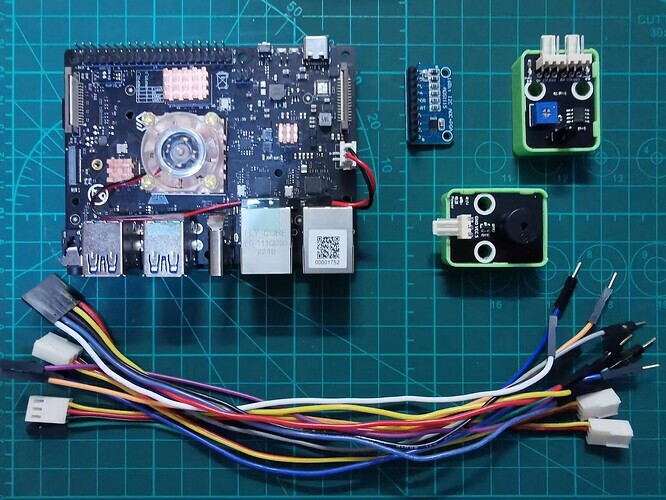
1. Preparation
-
Development board: VisionFive/VisionFive 2
-
Flame sensor: Flame sensor with AO output
-
Analog to digital conversion module: ADS1115
-
Buzzer: Passive buzzer
-
DuPont Line: Many

As for the spaceific usage of flame sensor and ADS1115,refer to Demo 9 - Using Flame Sensors to Detect Flame on VisionFive 2
2. The principle of buzzer
The specific buzzer modules used in this demo are as follows:
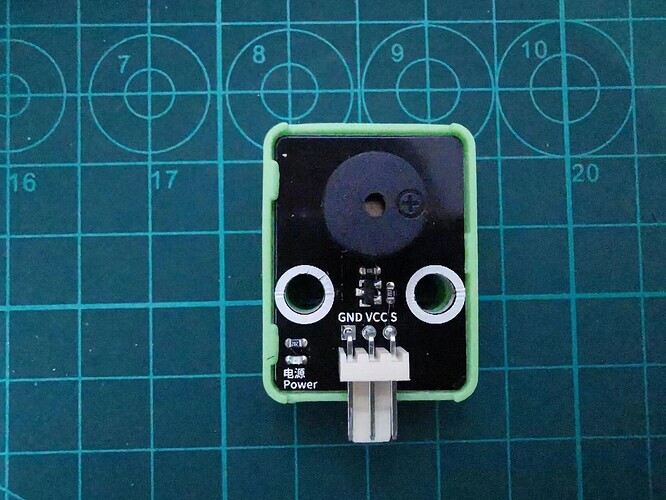
The buzzer is divided into active buzzer and passive buzzer. The active and passive here does not refer to the power supply, but rather to whether there is a vibration source inside the buzzer.
The active buzzer comes with a built-in vibration source, which can produce sound as long as the voltage is given. It’s very simple to use. The program on the board uses a digital GPIO port to control its signal input port, which produces sound when outputting high levels, and does not produce sound when outputting low levels. However, the frequency of its sound production is fixed and cannot be changed during use.
There is no oscillation source inside the passive buzzer, and directly outputting a high level signal to its input port will not make it sound. It needs to be driven to sound through a 200-5KHz square wave. Square waves of different frequencies can bring about changes in tone, and by controlling frequency and duration, MIDI mono music playback can be achieved.
In this demo, we will disscuse the use of passive buzzers. The use of active buzzers is easy for everyone to understand without any difficulty.
3. The use of passive buzzer
Based on the principle of the passive buzzer mentioned above, we can learn that to drive its sound, it is necessary to provide a square wave driving signal with a frequency of 200-5KHz.
Because the frequency of 200-5KHz is not high, the high and low level time of the GPIO port can be directly controlled to achieve square wave output.
Firstly, connect the AO interface of the flame sensor module to the AO interface of ADS1115, so that ADS1115 can obtain the AO signal output by the flame sensor. For specific connection methods, please refer to Demo 9 - Using Flame Sensors to Detect Flame on VisionFive 2
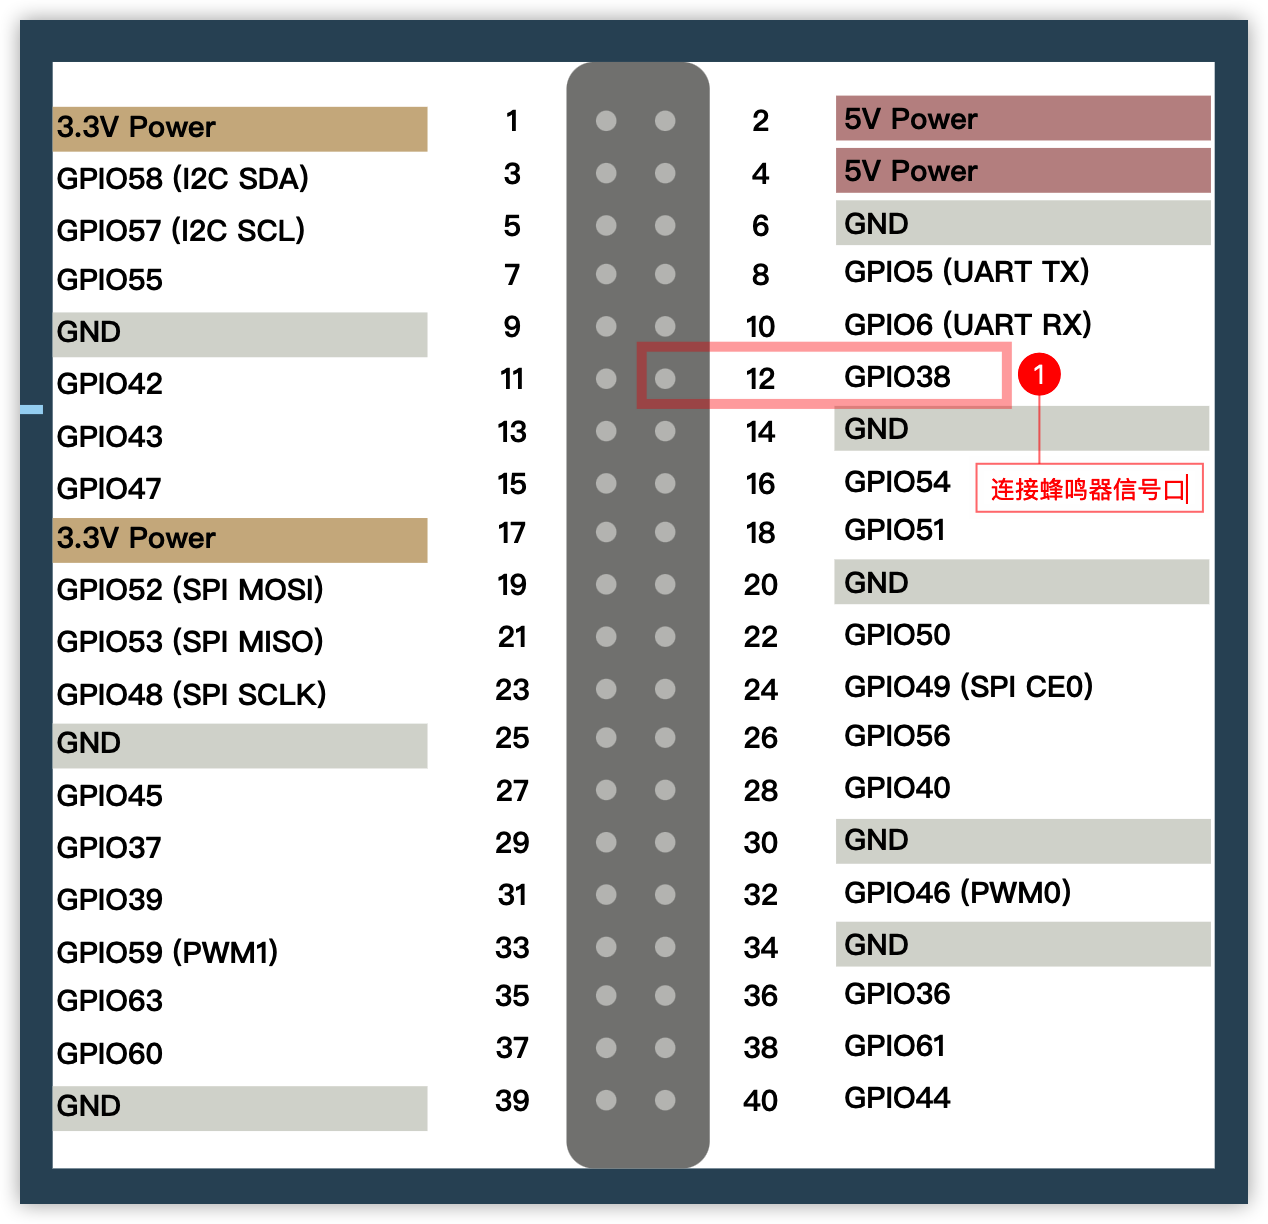
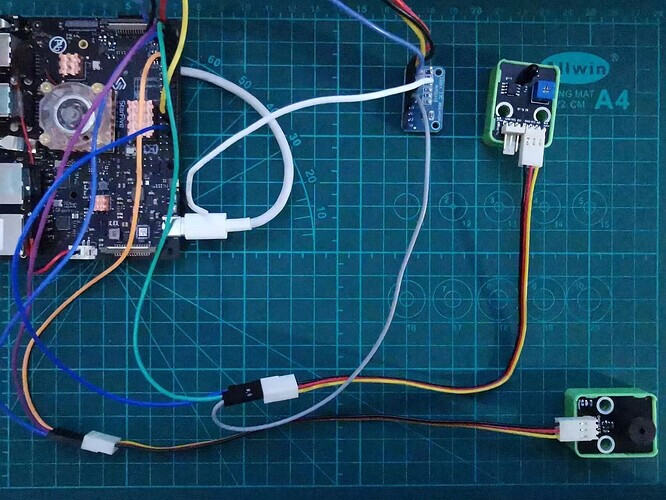
Then, refer to the following figure and connect the passive buzzer to VisionFive:
Connection:
Note:
The power supply voltage should be determined based on the actual sensor used. The flame sensor module and ADS1115 module in this demo uses a 5V power supply voltage. The passive buzzer used can be powered by 5V or 3.3V, which is 3.3V in the course.
StarFive Official has provided us with the test program of buzzer, you can lick to download. The specific contents are as follows:
'''
Please make sure the buzzer is connected to the correct pins.
The following table describes how to connect the buzzer to the 40-pin header.
-----------------------------------------
Passive Buzzer___Pin Number_____Pin Name
    VCC             1         3.3V Power
    GND             6           GND
    I/O             18          GPIO51
-----------------------------------------
'''

import VisionFive.gpio as GPIO
import time

buzz_pin = 12
ErrOutOfRange = 0

def setup():
    #Configure the direction of buzz_pin as out.
    GPIO.setup(buzz_pin, GPIO.OUT)
    #Configure the voltage level of buzz_pin as high.
    GPIO.output(buzz_pin, GPIO.HIGH)

def pitch_in_check():
    val_in = input('Enter Pitch (200 to 20000): ')
    val = float(val_in)

    if 200 <= val <= 20000:
        return val
    else:
        print('The input data is out of range (200 to 20,000 Hz). Please re-enter.')
        return ErrOutOfRange

def loop(pitch, cycle):
    delay = 1.0 / pitch
    cycle = int((cycle * pitch)/2)

    #Buzzer beeps.
    while cycle >= 0:
        GPIO.output(buzz_pin, GPIO.LOW)
        time.sleep(delay)
        GPIO.output(buzz_pin, GPIO.HIGH)
        time.sleep(delay)

        cycle = cycle - 1

def destroy():
    GPIO.output(buzz_pin, GPIO.HIGH)
    GPIO.cleanup()

if __name__ == '__main__':
    setup()
    try:
        #Input value of pitch (200 to 20,000 Hz).
        pitch = pitch_in_check()
        while pitch == 0:
            pitch = pitch_in_check()

        #Input value of cycle time (seconds).
        cycle_in = input("Enter Cycle (seconds): ")
        cycle = int(cycle_in)

        #The buzzer beeps with the specified pitch and cycle.
        loop(pitch, cycle)
    finally:
        destroy()
The key part of the above program is loop (pitch, cycle), where the former represents frequency and the latter represents playback duration. In the loop() call, the time for maintaining high and low levels is calculated based on frequency, and the number of cycles required is calculated based on the playback duration to achieve a specific frequency square wave that lasts for a specified time.
To run the above program, you also need to install the corresponding StarFive GPIO support library, as follows:
# Install extension library
sudo pip show VisionFive.gpio
After writing, run buzzer.py and enter the frequency Pitch and Cycle duration according to the prompts to drive the buzzer to sound.
python3 buzzer.py

After driving the buzzer to sound successfully, we will write another program called buzzer_alarm.py allows the buzzer to alternately sound at two frequencies, with the specific code as follows:
# -*- coding: utf-8 -*-
# file: ~/projects/buzzer/buzzer_alarm.py
import VisionFive.gpio as GPIO
import time

buzz_pin = 12
ErrOutOfRange = 0

def setup():
    #Configure the direction of buzz_pin as out.
    GPIO.setup(buzz_pin, GPIO.OUT)
    #Configure the voltage level of buzz_pin as high.
    GPIO.output(buzz_pin, GPIO.HIGH)

def loop(pitch, cycle):
    delay = 1.0 / pitch
    cycle = int((cycle * pitch)/2)

    #Buzzer beeps.
    while cycle >= 0:
        GPIO.output(buzz_pin, GPIO.LOW)
        time.sleep(delay)
        GPIO.output(buzz_pin, GPIO.HIGH)
        time.sleep(delay)

        cycle = cycle - 1

def destroy():
    GPIO.output(buzz_pin, GPIO.HIGH)
    GPIO.cleanup()

if __name__ == '__main__':
    setup()
    try:
        while True:
            pitch = 1200
            cycle = 1
            loop(pitch, cycle)

            pitch = 1000
            cycle = 1
            loop(pitch, cycle)
    finally:
        destroy()
After writing, run buzzer_alarm.py, the buzzer will sound alternately in two different tones.
python3 buzzer_alarm.py
4. The function achievement of the fire alarm device
In the use of passive buzzers, it is already possible to drive the buzzer to sound. Combined with Demo 9 - Using Flame Sensors to Detect Flame on VisionFive 2, when the intensity of fire light is detected to be above a certain threshold, the buzzer is driven to sound, thereby achieving the function of fire alarm.
The specific code is as follows:
# -*- coding: utf-8 -*-
# file: ~/projects/buzzer/fire_alarm.py
import VisionFive.gpio as GPIO
import ADS1115
import time
import numpy
import smbus2

FIRE_ALARM_VALUE = 40
buzz_pin = 12

# Initialize ADS1115 module
ads = ADS1115.ADS1115()

def setup():
    #Configure the direction of buzz_pin as out.
    GPIO.setup(buzz_pin, GPIO.OUT)
    #Configure the voltage level of buzz_pin as high.
    GPIO.output(buzz_pin, GPIO.HIGH)

def loop(pitch, cycle):
    delay = 1.0 / pitch
    cycle = int((cycle * pitch)/2)

    #Buzzer beeps.
    while cycle >= 0:
        GPIO.output(buzz_pin, GPIO.LOW)
        time.sleep(delay)
        GPIO.output(buzz_pin, GPIO.HIGH)
        time.sleep(delay)

        cycle = cycle - 1

def destroy():
    GPIO.output(buzz_pin, GPIO.HIGH)
    GPIO.cleanup()

if __name__ == '__main__':
    setup()
    try:
        while True:
            #  Read the data of channal 0 of ADS1115
            volt = ads.readADCSingleEnded(0)

            # Conversion
            per = numpy.interp(volt, [0, 5000], [0, 100])

            # Output infomation
            print("%d mV of A0, val is %f" % (volt, per))

            if per >= FIRE_ALARM_VALUE:
                print("    Fire Alarm!!!")
                pitch = 800
                cycle = 0.2
                loop(pitch, cycle)

                pitch = 1000
                cycle = 0.2
                loop(pitch, cycle)
            else:
                time.sleep(1)
    finally:
        destroy()
In the above program, first obtain the detection data of the flame sensor through ADS1115, and then check if the data reaches the threshold. If it does, it will drive the buzzer to sound, otherwise it will not sound.
After writing, run fire_alarm.py , the buzzer will not sound by default. If a flame is used to approach the flame sensor within a certain distance, it will sound and use different frequency variations.
python3 fire_alarm.py
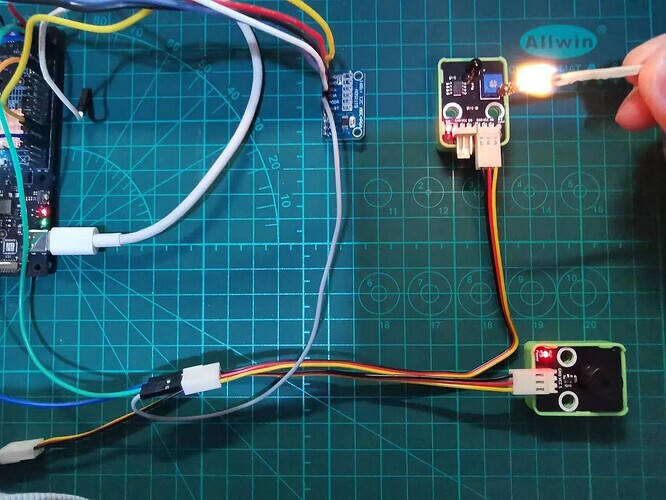
The actual test situations are as follows:
- Light the match and approach the buzzer:
- Actual alarm data:

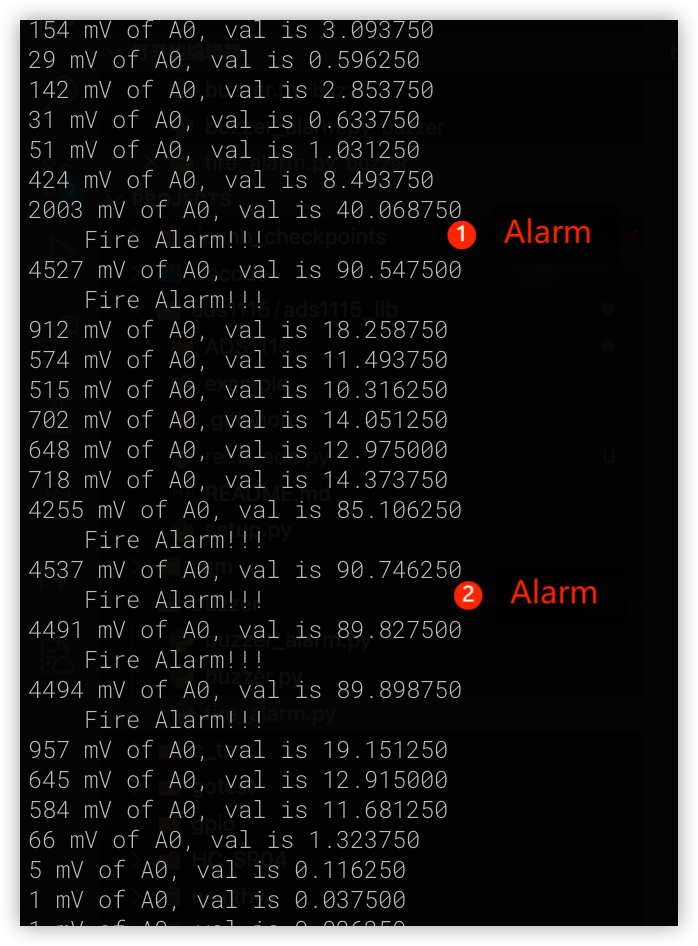
During the test, when the buzzer did not detected, the simulated output value of the flame sensor was small.
When using a match flame to approach the sensor in a certain distance, the simulated output of the flame sensor significantly increases by more than 40, triggering an alarm and using different frequencies to alternately sound to remind attention.
5. Summary
In this demo, we learned about the use of passive buzzers and the use of flame sensors to achieve fire alarm functions.
In practical, multiple external devices often need to cooperate with each other to achieve specific functions. The function of fire alarm can not only be combined with a buzzer to generate an audible warning, but also can be combined with a red light flashing warning.