Credit to Samuel
本文为VisionFive的OpenEuler安装指南,有一定基础的朋友可以参照。原文地址:
操作手册:Build openeuler on visionfive
1 准备工作
1.1 硬件准备
1)visionfive开发板:由starfive获取得到开发板。
2)64G micro-sd卡及读卡器:SanDisk TF/MicroSD卡,容量64GB,速度U1,带读卡器。
3)Usb转uart串口通信模块:丢石头 PL2303,3.3/5V电平输出,type A接口,10PIN散头杜邦线。
4)电源适配器及type-c线:Helloblock 树莓派4B/3B+电源适配器Type-c,开关充电线5V3A,适用ZERO/W 电源 + Type-C线 + Micro USB线。
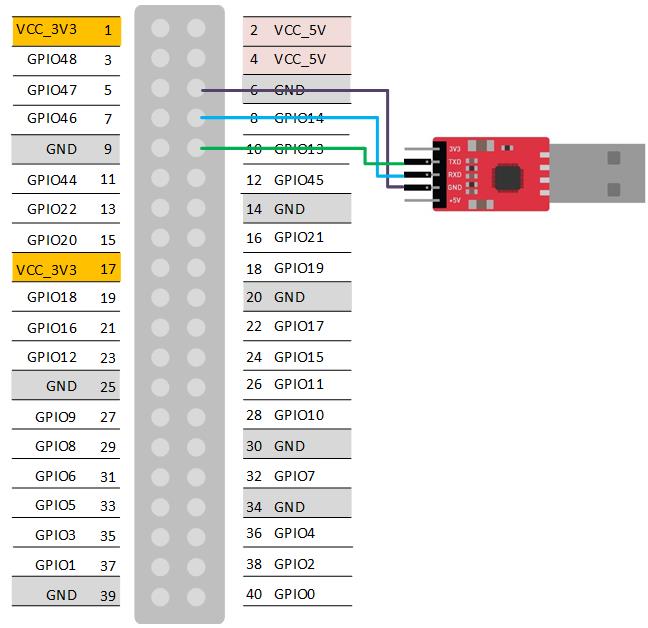
5)连接visionfive开发板的40-Pin GPIO端和Usb转uart串口通信模块。
- GND连接6 GND
- RXD连接8 GPIO14(UART TX)
- TXD连接10 GPIO13(UART RX)
如下图:
1.2 软件准备
1)预备Flash中需要安装的软件:
- bootloader,下载源码并完成编译。
git clone https://github.com/starfive-tech/JH7100_secondBoot.git
- ddr init,下载源码并完成编译。
git clone https://github.com/starfive-tech/JH7100_ddrinit.git
- u-boot,下载源码并完成编译。
git clone https://github.com/starfive-tech/u-boot
注意:这部分源码需要修改u-boot/include/configs/starfive-jh7100.h
具体操作:参看《操作手册:Prepare firmware for visionfive》。
参考输出:
bootloader-JH7100-220211.bin.out
2)预备micro sd卡中需要安装的软件:
- starfive linux kernel,下载源码并完成编译。
git clone https://github.com/starfive-tech/linux
- openeuler riscv文件系统镜像,使用openEuler-22.03.riscv64.qcow2
wget --no-check-certificate https://mirror.iscas.ac.cn/openeuler-sig-riscv/openEuler-RISC-V/development/2203/Image/openEuler-22.03.riscv64.qcow2
具体操作:参看《操作手册:Prepare kernel and rootfs for visionfive》。
参考输出:
jh7100-starfive-visionfive-v1.dtb
1.3 外设准备
1)显示器:连接开发板HDMI接口,此处采用的是联想(ThinkVision)S系列S27e-20 27英寸(HDMI+VGA)。
2)USB无线键盘鼠标:连接开发板USB接口,此处采用的是联想ThinkPad 4X30M39458无线键盘鼠标套装。
3)网线:连接开发板RJ45接口,此处采用绿联(UGREEN)六类网线。
1.4 调试主机准备
电脑主机1台,并在其上安装Ubuntu虚拟主机。其中电脑主机通过串口操作开发板上的Flash,Ubuntu虚拟主机通过读卡器操作micro sd卡。
1.5 micro sd卡磁盘分区准备
使用fdisk将micro sd卡分为两个分区:第一分区格式为 FAT32,大小 500M,用来安装Linux内核,为启动分区。第二个分区为 ext4,占剩下的所有空间,用来安装 openeuler的文件系统,为文件系统分区。
/dev/sdb1   500M    /media/riscv/715D-A517
/dev/sdb2   58G     /media/riscv/rootfs
具体操作:参看《操作手册:Prepare micro sd card for visionfive》。
2 系统安装
2.1 安装bootloader, ddr init , u-boot到Flash中
1)将Usb转uart串口通信模块连接到电脑usb口。
2)检查设备管理器中的COM端口,例如COM3。
3)使用Xmodem安装固件。
- 安装teraterm
- 选择菜单setup->Serial port setup
- Speed设置为115200
- Data设置为8bit
- Paritv设置为none
- Stoo bits设置为1bit
- Flowcontrol设置为none
4)开启visionfive开发板电源,在倒数结束之前按任意键,例如空格键进入Flash菜单。
5)输入root@s5t进入扩展版本的Flash菜单,键入0,开始刷Flash。
6)选择菜单File > Transfer > XMODEM > Send来发文件。依次安装BootLoader、ddrinit以及uboot。
2.2 安装starfive linux kernel到micro sd卡中
1)将micro sd卡放入读卡器中,连接电脑。
2)复制starfive linux kernel文件到启动分区sdb1中
sudo cp Image.gz /media/riscv/715D-A517/
sudo cp jh7100-starfive-visionfive-v1.dtb /media/riscv/715D-A517/
3)将micro sd卡放入visionfive开发板验证kernel
考虑到teraterm界面不够美观,安装并设置mobaxterm。
验证启动界面:出现VisionFive#提示符,则表示正常启动,但还没有文件系统。
2.3 安装openeuler riscv文件系统到micro sd卡中
1)将micro sd卡放入读卡器中,连接电脑。
2)openeuler riscv镜像挂载
加载 nbd 内核模块。“max_part=N” 选项指定我们想要通过 nbd 管理的分区的最大个数。磁盘镜像导出为网络块设备(/dev/nbd0,/dev/nbd1,/dev/nbd2等块设备中未使用的块)
sudo modprobe nbd max_part=8
sudo /opt/qemu/bin/qemu-nbd -c /dev/nbd1 openEuler-preview.riscv64.qcow2
挂载/dev/nbd1p1到rootfs目录中
sudo mount /dev/nbd1p1 /home/riscv/riscv64-linux/rootfs
3)从rootfs目录复制文件系统到micro sd卡中,sync指令会将存于 buffer 中的数据强制写入硬盘中,避免没有复制完全的情况。
sudo cp -r /home/riscv/riscv64-linux/rootfs/* /media/riscv/rootfs/
sync
4)文件系统复制完成后,取消挂载
sudo umount /home/riscv/riscv64-linux/rootfs
取消镜像加载
sudo /opt/qemu/bin/qemu-nbd -d /dev/nbd1
5)将micro sd卡放入visionfive开发板验证openeuler riscv文件系统
验证启动界面:出现[root@openEuler-RISCV-rare ~]#提示符,则表示正常启动。
3 系统配置
3.1 用户设置
登录用户:root
默认密码:openEuler12#$
3.2 DNS设置
vim /etc/resolv.conf
nameserver 119.29.29.29
3.3 时间设置
设置当前时间,例如:
date -s "2022-04-25 14:27:50"
4 安装xfce图形界面
4.1 添加xfce软件源
修改repo:
vim /etc/yum.repos.d/openEuler.repo
清除文本内容:
:%d
添加以下内容:
[standard]
name=standard
baseurl=https://mirror.iscas.ac.cn/openeuler-sig-riscv/openEuler-RISC-V/development/2203/Everything/
enabled=1
gpgcheck=0

[xfce4]
name=xfce4
baseurl=http://121.36.3.168:82/home:/pandora:/xfce4/webkit2gtk3/
enabled=1
gpgcheck=0
4.2 安装xfce4
安装过程中跳过broken的包
yum install libxfce4util xfconf libxfce4ui exo garcon thunar thunar-volman tumbler xfce4-appfinder xfce4-panel xfce4-power-manager xfce4-settings xfdesktop xfwm4 xfce4-session xfce4-terminal --skip-broken -y
再次修改软件源:
vim /etc/yum.repos.d/openEuler.repo
文件修改为如下内容:
[standard]
name=standard
baseurl=https://mirror.iscas.ac.cn/openeuler-sig-riscv/openEuler-RISC-V/development/2203/Everything/
enabled=1
gpgcheck=0

[standard1]
name=standard1
baseurl=https://mirror.iscas.ac.cn/openeuler-sig-riscv/openEuler-RISC-V/development/mainline/standard_riscv64/
enabled=1
gpgcheck=0

[xfce4]
name=xfce4
baseurl=http://121.36.3.168:82/home:/pandora:/xfce4/webkit2gtk3/
enabled=1
gpgcheck=0
yum install libxfce4util xfconf libxfce4ui exo garcon thunar thunar-volman tumbler xfce4-appfinder xfce4-panel xfce4-power-manager xfce4-settings xfdesktop xfwm4 xfce4-session xfce4-terminal -y
4.3 安装 xorg 的软件包
yum install xorg-x11-xinit -y
yum install xorg-x11-server -y
dnf install pango
dnf upgrade pango
5 启动 Xfce
startxfce4
6 参考资料
https://gitee.com/yunxiangluo/riscv-openeuler/blob/master/chapter3/class1/README_1.md