According to StarFive, developers have successfully used VisionFive/VisionFive 2 to control smart home remotely. This demo implements the VisionFive 2/VisionFive to obtain the published temperature and humidity values through MQTT in real-time on the mobile phone, and control the brightness of the LED lights connected to the development board through the mobile phone.and the specific instructions are as follows:
1. Preparation
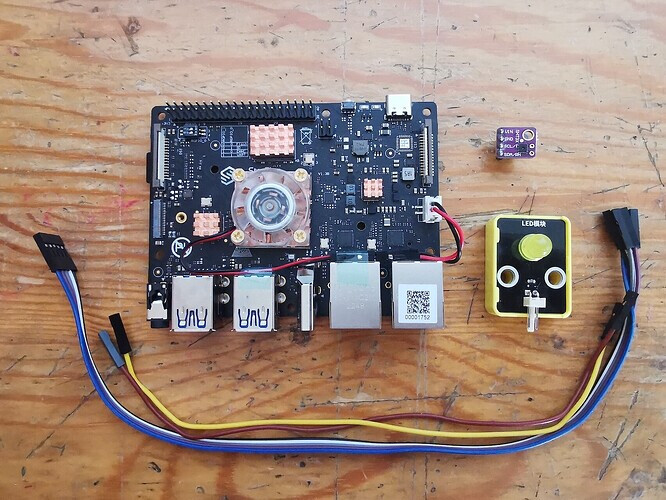
- Development board: VisionFive/VisionFive 2 SBC
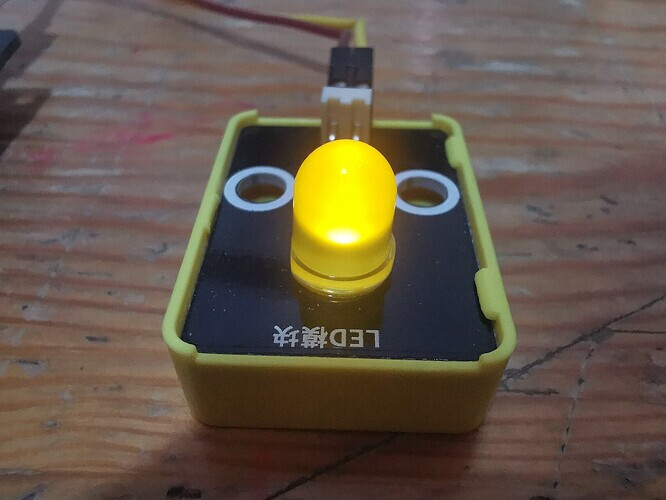
- Temperature sensor: SHT30 temperature sensor
- LED: Single-color LED module
- DuPont Line: Many

2. The principle of remote control
In this demo, remote control is based on the MQTT protocol.
MQTT protocol is an IoT communication protocol based on publish/subscribe pattern mode. It occupies half of the IoT protocols by virtue of its simple implementation, support for QoS, small message size and other characteristics.
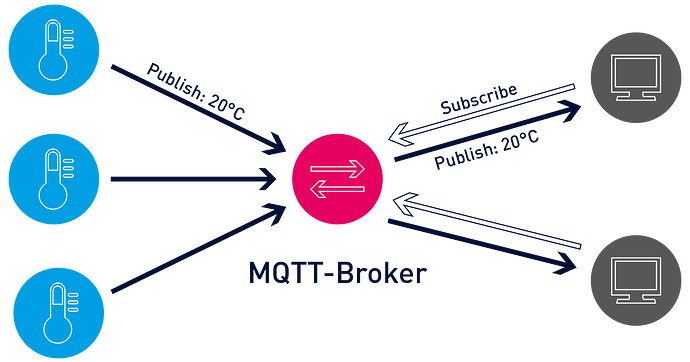
Through the MQTT protocol, on the program of VisionFive, we can publish the collected sensor information to the MQTT server. Other applications can obtain the published information by subscribing to the corresponding information. Similarly, other applications can also publish control instruction messages to the MQTT server. After receiving the corresponding control instruction messages, the program on the Starlight development board can control external devices.
3. Connection
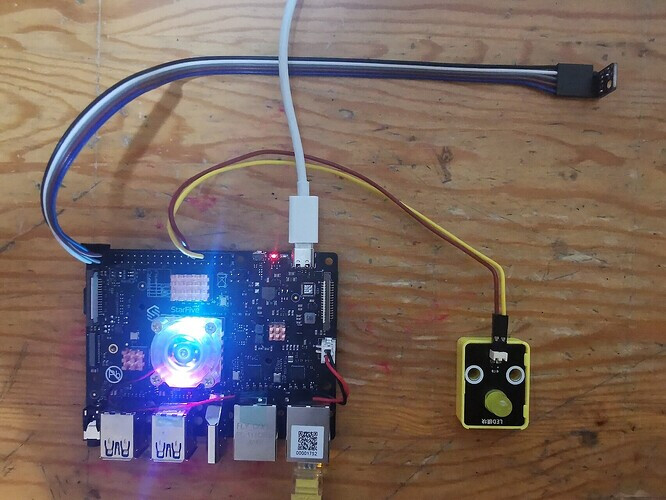
Firstly, refer to the following figure and connect the temperature sensor and LED to VisionFive:
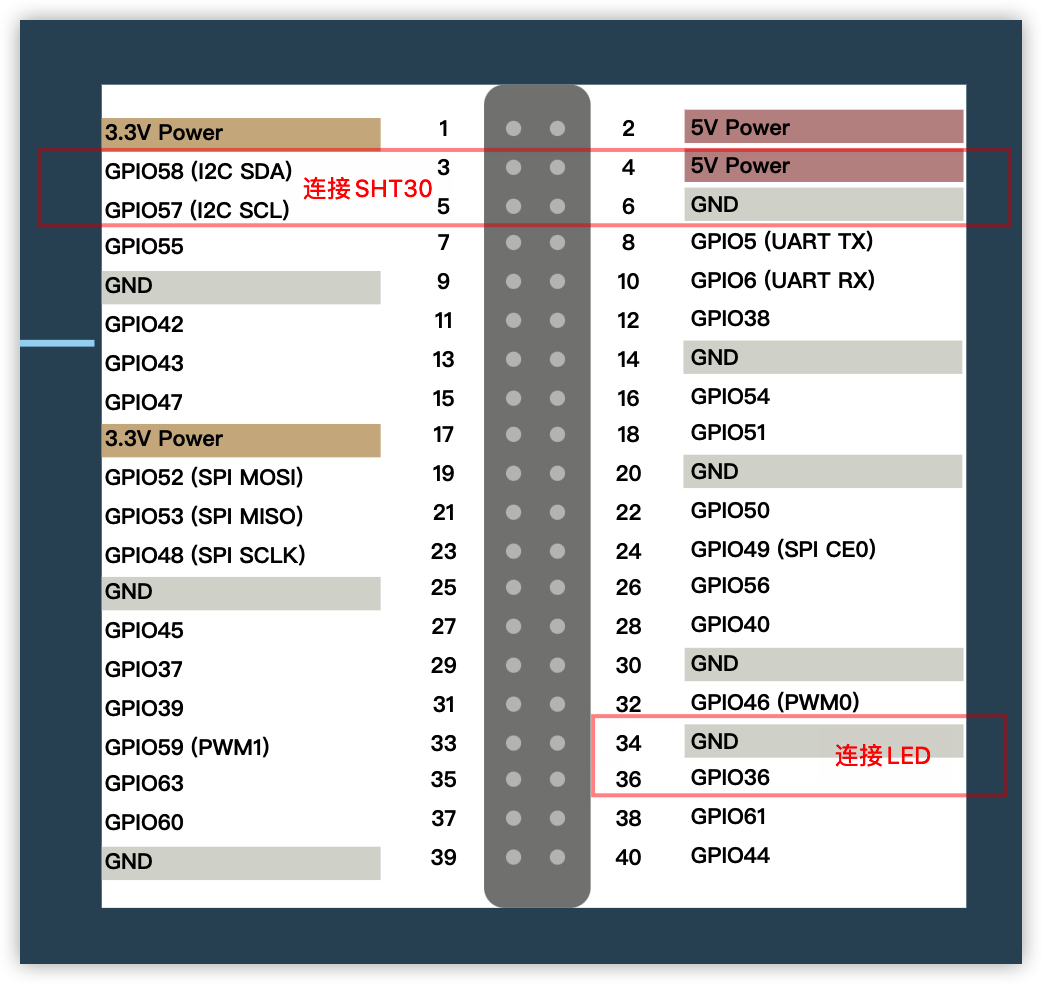
Connection:
4. Coding
In this demo, the use of SHT30 temperature and humidity sensors has been explained before. Please read this course in advance to understand.
In addition, Saifang also provides an application guide (Python) - Using VisionFive 2 to Make an LED Blink at the PWM Frequency, demonstrating how to use PWM to control the LED. The PWM control in this course is based on this application guide, please review and understand in advance.
Then, we write the following program iot_test.py:
# -*- coding: utf-8 -*-
# file: ~/projects/iot/iot_test.py

import random
import time
import json

from paho.mqtt import client as mqtt_client
from sensirion_i2c_driver import I2cConnection
from sensirion_i2c_sht.sht3x import Sht3xI2cDevice
from sensirion_i2c_driver.linux_i2c_transceiver import LinuxI2cTransceiver
import VisionFive.gpio as GPIO

GPIO.setmode(GPIO.BCM)		#set pin numbering system
led_pin = 36
led_brightness = 0
GPIO.setup(led_pin, GPIO.OUT)
p = GPIO.PWM(led_pin, 1000)
p.start(0)
p.ChangeDutyRatio(0)

# Open SHT3X devices
i2c_transceivervice = LinuxI2cTransceiver('/dev/i2c-0')
sht3x = Sht3xI2cDevice(I2cConnection(i2c_transceivervice))

broker = 'broker-cn.emqx.io'
port = 1883
topic_base = "/vf2/iot"
# generate client ID with pub prefix randomly
client_id = f'vf2-iot-client-{random.randint(0, 1000)}'

is_connected = False

def connect_mqtt():
    def on_connect(client, userdata, flags, rc):
        global is_connected
        if rc == 0:
            is_connected = True
            print("Connected to MQTT Broker!")
        else:
            print("Failed to connect, return code %d\n", rc)

    client = mqtt_client.Client(client_id)
    client.on_connect = on_connect
    client.connect(broker, port)
    return client

def publish(client):
    while True:
        # Read the value of temperature and humidity
        temperature, humidity = sht3x.single_shot_measurement()

        # Print current data and calculated results
        print("{:0.2f} °C , {:0.2f} %RH, {:d}".format(
            temperature.degrees_celsius,
            humidity.percent_rh, led_brightness))

        msg = json.dumps({
            "temperature": format(temperature.degrees_celsius,'.1f'),
            "humidity": format(humidity.percent_rh,'.0f'),
            "brightness": led_brightness
            })

        topic = "%s/report" % topic_base
        result = client.publish(topic, msg)
        # result: [0, 1]
        status = result[0]
        if status == 0:
            print(f"Send `{msg}` to topic `{topic}`")
        else:
            print(f"Failed to send message to topic {topic}")

        time.sleep(5)

def subscribe(client: mqtt_client):
    def on_message(client, userdata, msg):
        global led_brightness
        print(f"Received `{msg.payload.decode()}` from `{msg.topic}` topic")
        json_data = json.loads(str(msg.payload.decode()))

        if 'led' in json_data:
            led_brightness = int(json_data['led'])
            if led_brightness>100:
                led_brightness = 100
            elif led_brightness<0:
                led_brightness = 0
            p.ChangeDutyRatio(led_brightness)
            print("Set LED brightness to %d" % led_brightness)

    topic = "%s/cmd" % topic_base
    client.subscribe(topic)
    client.on_message = on_message

def run():
    client = connect_mqtt()
    client.loop_start()
    while not is_connected:
        time.sleep(1)
    subscribe(client)
    publish(client)

if __name__ == '__main__':
    run()
In the above code, we connect the wire to the mqtt service and then use the LED_ Brightness saves the current LED brightness value, reads the temperature value from SHT30, and then publishes temperature, humidity, and brightness data to the/vf2/iot/report topic through mqtt. At the same time, subscribe to the mqtt/vf2/iot/cmd topic, receive control command messages, and after receiving the message, control the brightness of the LED based on the LED value in the message body (JSON format).
The core call of the mqtt section:
- Connect_Mqtt(): Connect to the mqtt service
- Publish(): Loosely read sensor data and then publish it
- Subscribe(): Subscribe to the control instruction message and perform corresponding processing upon receiving the message
In the above code, for the convenience of testing, the mqtt service used is the public service broker-cn.emqx.io provided by EMQX, which can be directly connected and used. If used in formal applications, you can build your own mqtt server to ensure security.
5. Operation Result
To run the above programs, it is also necessary to install the corresponding third-party support libraries
*#Install Extension Library*
sudo pip install sensirion-i2c-sht
sudo pip install VisionFive.gpio
sudo pip3 install -i https://pypi.doubanio.com/simple paho-mqtt
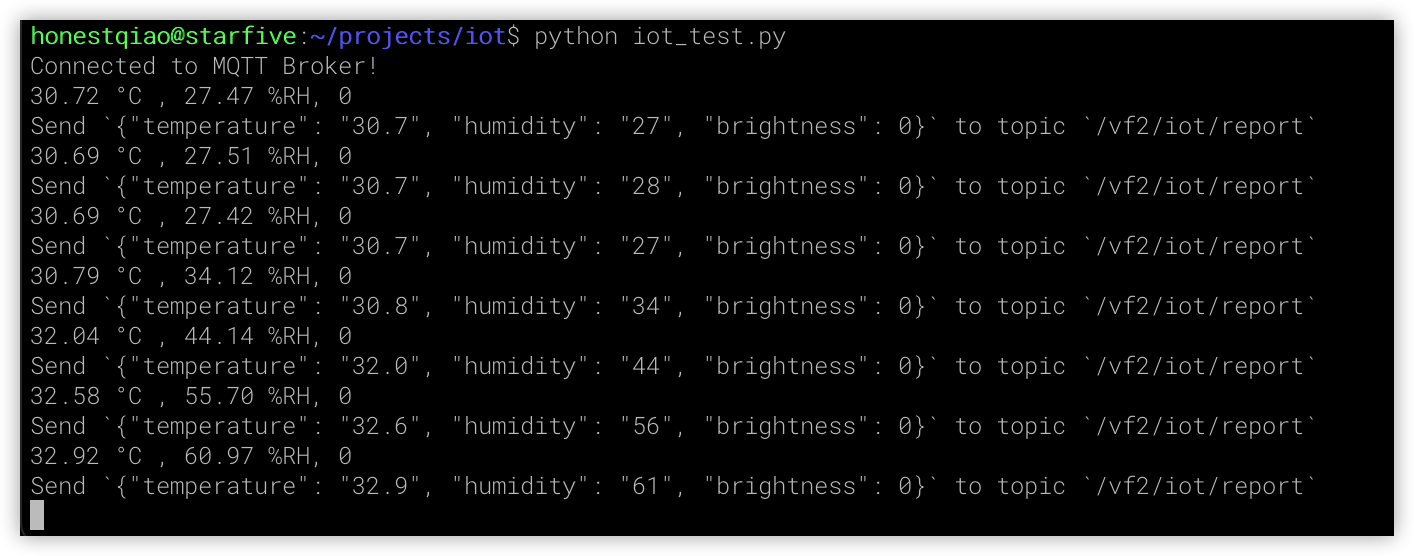
After writing, run iot_test. py, and you can start testing remote information reception and viewing.
python3 iot_test.py
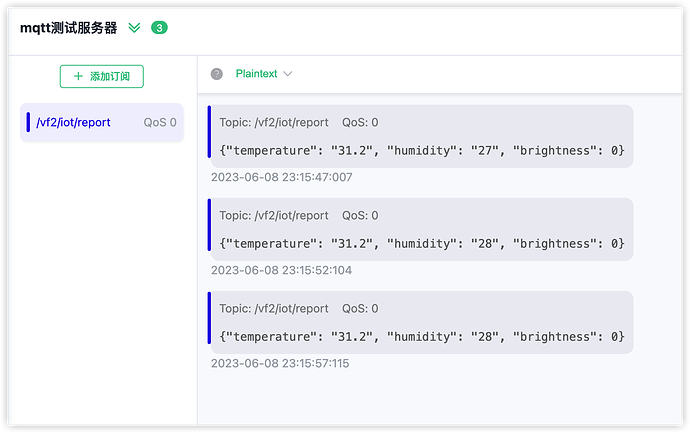
- Public massage
After the program runs, it will automatically connect to the mqtt server for message publishing:
- Receive massage
We can download the MQTTX client tool and connect to the mqtt service to obtain the reported information. MQTTX download address: https://mqttx.app/zh
In MQTTX, connect to broker-cn.emqx.io by using username emqx and password public, and then subscribe to /vf2/iot/report to receive the message:
- Control command
In MQTTX, send the corresponding control command to /vf2/iot/cmd to control the brightness of the LED:- Send 50% brightness control command:
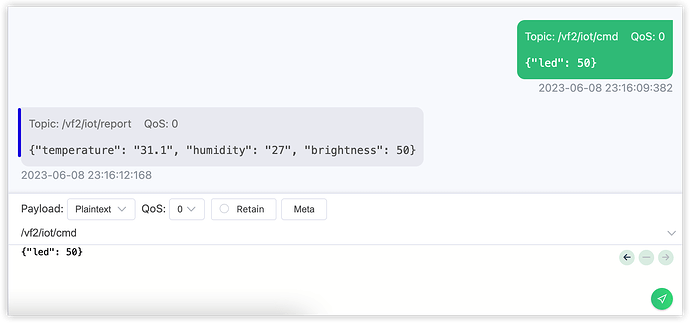
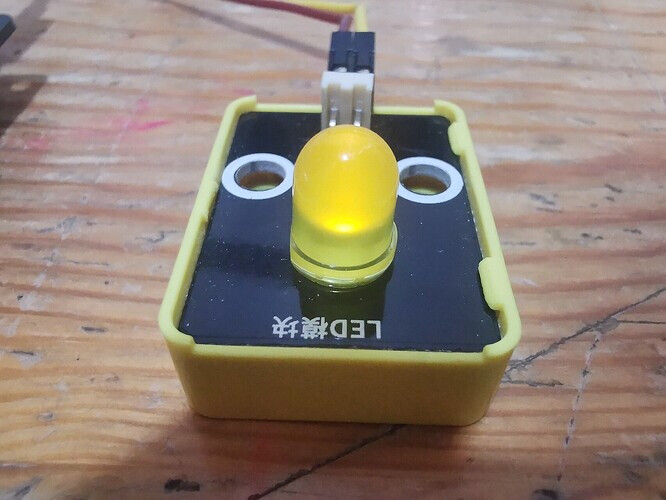
The VisionFive will display the following after receiving the command:

- Send 100% brightness control command:
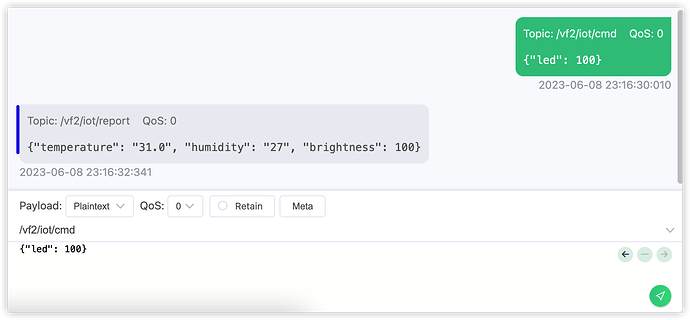
The VisionFive will display the following after receiving the command:

- Send 50% brightness control command:


6. Controled by mobile phone
Through the previous steps, we can already obtain sensor information through mqtt and control the LED connected to VisionFive.
On this basis, we can install the Mqtt Dashboard application on our mobile phone, enabling us to view sensor information and control it on the mobile end.
Mqtt Dashboard download address: https://play.google.com/store/apps/details?id=com.app.vetru.mqttdashboard&hl=zh_CN
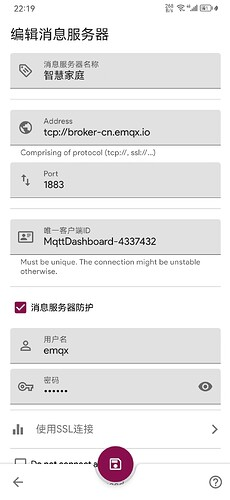
After downloading, first add the message service:
Then, add corresponding controls to display and control the information of the sensor:
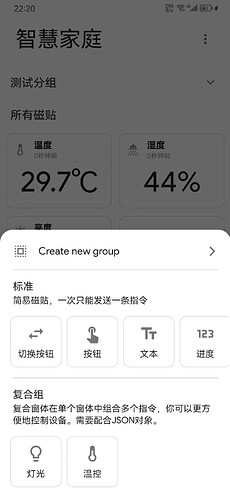
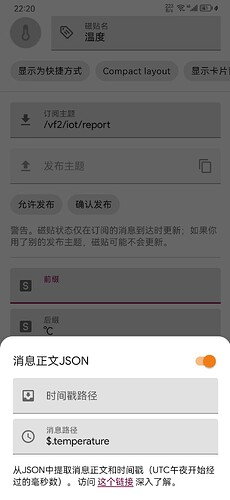
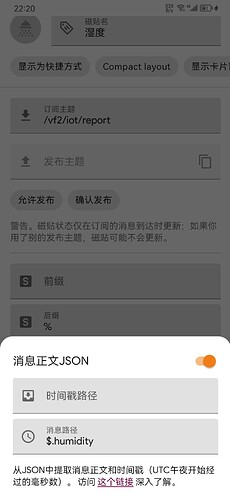
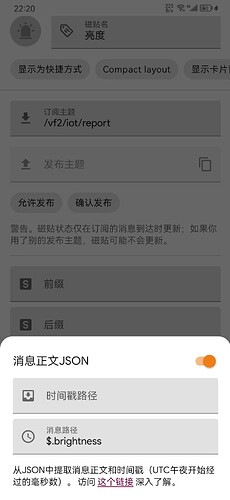
Use text controls for temperature, humidity, and LED brightness information:
Control the use of button controls:
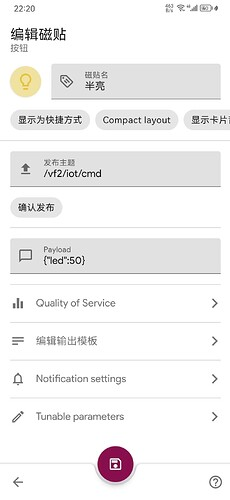
Refer to semi-bright, set full bright {led: 100} and off {“led”: 0}:
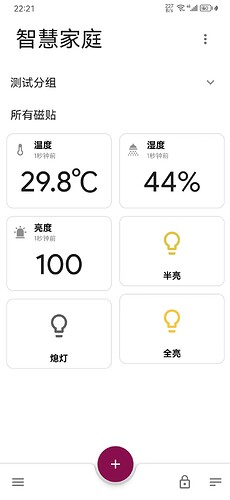
After making the above settings, you can receive the message sent by VisionFive through mqtt on the home screen and present it to the corresponding control.
By clicking the semi bright, fully bright, and off buttons, control commands can be issued to VisionFive through mqtt to control the LED brightness.
7. Summary
In this demo, we learned how to combine the MQTT protocol with VisionFive for general use, obtain reported sensor data, and issue control commands to control the brightness of LEDs.
The MQTT protocol is one of the important foundations for the development of the IoT. MQTT protocol is widely used in the IoT, mobile Internet, intelligent hardware, IoV, power, energy and other fields. It can not only be used as a gateway to access communications on the device side, but also as a device cloud communication protocol.