本文源于EEworld用户:lijinlei
详细介绍了昉·星光2 RISC-V单板计算机连接USB摄像头,并基于OpenCV模型实现人脸识别、物体识别、二维码识别和图像边缘检测的应用,为该设备在人工智能方面和边缘 AI 的应用与开发提供了参考。
一、准备工作
完成前面帖子描述的软件库更新流程后,终端输入以下指令验证 OpenCV 是否可以正常调用
python3
import cv2
若出现错误,如:
ImportError: libtiff.so.5: cannot open shared object file: No such file or directory
该错误是由于 OpenCV (cv2) 依赖的libtiff 动态库(libtiff.so.5)在系统中缺失或未正确安装。
二、 库函数调用
可先使用指令 sudo find / -name "libtiff*.so*" 查询是否安装 libtiff.so.5 库;
若回复有相应的库:
/usr/lib/riscv64-linux-gnu/evince/4/backends/libtiffdocument.so
/usr/lib/riscv64-linux-gnu/libtiffxx.so
/usr/lib/riscv64-linux-gnu/libtiff.so.6.0.0
/usr/lib/riscv64-linux-gnu/libtiffxx.so.6.0.0
/usr/lib/riscv64-linux-gnu/libtiffxx.so.6
/usr/lib/riscv64-linux-gnu/libtiff.so
/usr/lib/riscv64-linux-gnu/libtiff.so.6
则表明系统中已有 libtiff.so 但版本不同(如 libtiff.so.6 ),可以创建软链接:
sudo ln -s /usr/lib/riscv64-linux-gnu/libtiff.so.6 /usr/lib/riscv64-linux-gnu/libtiff.so.5
若没有相应的库,则需安装 apt install libtiff-dev 最新动态链接库。
此时再测试 import cv2 则正常运行。
三、硬件连接
连接摄像头与开发板,可使用 MSI 摄像头或 USB 摄像头

通过指令
v4l2-ctl --list-devices 查询已连接图像采集设备及其索引号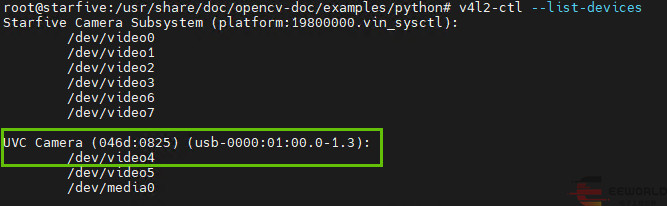
这里使用的罗技 C270 是标准的 UVC 设备,对应的索引号为
/dev/video4 .
四、人脸检测
通过 OpenCV 模型实现人脸检测、轮廓标注、置信度和识别。
代码
新建 face_detection.py 文件,并添加如下代码:
import cv2

face_cascade = cv2.CascadeClassifier("/usr/share/opencv4/haarcascades/haarcascade_frontalface_default.xml")

cap = cv2.VideoCapture(4, cv2.CAP_V4L2)

while True:
    ret, frame = cap.read()
    if not ret:
        break

    gray = cv2.cvtColor(frame, cv2.COLOR_BGR2GRAY)

    faces = face_cascade.detectMultiScale(
        gray,
        scaleFactor=1.1,
        minNeighbors=5,
        minSize=(30, 30)
    )


    for (x, y, w, h) in faces:
        cv2.rectangle(frame, (x, y), (x+w, y+h), (0, 255, 0), 2)

    cv2.imshow('Face Detection', frame)

    if cv2.waitKey(1) & 0xFF == ord('q'):
        break

cap.release()
cv2.destroyAllWindows()
完成后保存代码,执行 python3 face_detection.py ,自动弹出摄像头实时画面显示框。
实时视频窗口会显示人脸检测结果,绿色框标识人脸位置。
效果
将摄像头对准人物照片,即可自动检测人脸并框选:


更多人物图片的测试情况:

参考: VisionFive 2 与 OpenCV .
显示置信度
要在人脸检测的同时显示检测的 准确率(置信度),需要使用 基于深度学习的检测模型(如 OpenCV 的 DNN 模块或 FaceNet),传统的 Haar 级联分类器不直接提供置信度分数。
下载 预训练模型文件
若遇到网络连接问题,可将 https://github.com 修改为 https://bgithub.xyz 实现加速下载。
代码
新建文件夹,放置预训练模型文件、 face_detection.py 程序文件,代码如下
import cv2
import numpy as np

net = cv2.dnn.readNetFromCaffe("deploy.prototxt", "res10_300x300_ssd_iter_140000.caffemodel")

cap = cv2.VideoCapture(4, cv2.CAP_V4L2)

while True:
    ret, frame = cap.read()
    if not ret:
        break

    (h, w) = frame.shape[:2]
    blob = cv2.dnn.blobFromImage(cv2.resize(frame, (300, 300)), 1.0,
                                (300, 300), (104.0, 177.0, 123.0))
    net.setInput(blob)
    detections = net.forward()

    for i in range(detections.shape[2]):
        confidence = detections[0, 0, i, 2]

        if confidence > 0.5:
            box = detections[0, 0, i, 3:7] * np.array([w, h, w, h])
            (startX, startY, endX, endY) = box.astype("int")

            cv2.rectangle(frame, (startX, startY), (endX, endY), (0, 255, 0), 2)
            text = f"Face: {confidence * 100:.2f}%"
            cv2.putText(frame, text, (startX, startY - 10),
                        cv2.FONT_HERSHEY_SIMPLEX, 0.5, (0, 255, 0), 2)

    cv2.imshow("Face Detection with Confidence", frame)
    if cv2.waitKey(1) & 0xFF == ord('q'):
        break

cap.release()
cv2.destroyAllWindows()
终端执行 python3 face_detection.py 运行代码,调用预训练模型文件。
效果
同样进行人脸照片测试:

实时视频窗口会显示人脸检测结果,绿色框标识人脸位置,同时显示置信度。

物体识别
运行 Python 语言应用:
进入 yolo-v5 第三方 demo 目录,以在昉·星光 2的 Debian 系统上运行基于 yolo-5 onnx 模型 Python 演示代码:
cd /usr/share/opencv4/yolo-v5/
python3 yolov5.py --device 4
/dev/video4 为 USB 摄像头索引号,可通过指令 ls /dev/video* 查询对应的图像采集设备索引号。
代码
打开 yolov5.py 代码
import cv2
import numpy as np
import argparse

# Constants.
INPUT_WIDTH = 640
INPUT_HEIGHT = 640
SCORE_THRESHOLD = 0.5
NMS_THRESHOLD = 0.45
CONFIDENCE_THRESHOLD = 0.45

# Text parameters.
FONT_FACE = cv2.FONT_HERSHEY_SIMPLEX
FONT_SCALE = 0.7
THICKNESS = 1

# Colors
BLACK  = (0,0,0)
BLUE   = (255,178,50)
YELLOW = (0,255,255)
RED = (0,0,255)


def draw_label(input_image, label, left, top):
    """Draw text onto image at location."""
    # Get text size.
    text_size = cv2.getTextSize(label, FONT_FACE, FONT_SCALE, THICKNESS)
    dim, baseline = text_size[0], text_size[1]
    # Use text size to create a BLACK rectangle.
    cv2.rectangle(input_image, (left, top), (left + dim[0], top + dim[1] + baseline), BLACK, cv2.FILLED);
    # Display text inside the rectangle.
    cv2.putText(input_image, label, (left, top + dim[1]), FONT_FACE, FONT_SCALE, YELLOW, THICKNESS, cv2.LINE_AA)


def pre_process(input_image, net):
    # Create a 4D blob from a frame.
    blob = cv2.dnn.blobFromImage(input_image, 1/255, (INPUT_WIDTH, INPUT_HEIGHT), [0,0,0], 1, crop=False)

    # Sets the input to the network.
    net.setInput(blob)

    # Runs the forward pass to get output of the output layers.
    output_layers = net.getUnconnectedOutLayersNames()
    outputs = net.forward(output_layers)
    # print(outputs[0].shape)

    return outputs


def post_process(input_image, outputs):
    # Lists to hold respective values while unwrapping.
    class_ids = []
    confidences = []
    boxes = []

    # Rows.
    rows = outputs[0].shape[1]

    image_height, image_width = input_image.shape[:2]

    # Resizing factor.
    x_factor = image_width / INPUT_WIDTH
    y_factor =  image_height / INPUT_HEIGHT

    # Iterate through 25200 detections.
    for r in range(rows):
        row = outputs[0][0][r]
        confidence = row[4]

        # Discard bad detections and continue.
        if confidence >= CONFIDENCE_THRESHOLD:
            classes_scores = row[5:]

            # Get the index of max class score.
            class_id = np.argmax(classes_scores)

            #  Continue if the class score is above threshold.
            if (classes_scores[class_id] > SCORE_THRESHOLD):
                confidences.append(confidence)
                class_ids.append(class_id)

                cx, cy, w, h = row[0], row[1], row[2], row[3]

                left = int((cx - w/2) * x_factor)
                top = int((cy - h/2) * y_factor)
                width = int(w * x_factor)
                height = int(h * y_factor)

                box = np.array([left, top, width, height])
                boxes.append(box)

    # Perform non maximum suppression to eliminate redundant overlapping boxes with
    # lower confidences.
    indices = cv2.dnn.NMSBoxes(boxes, confidences, CONFIDENCE_THRESHOLD, NMS_THRESHOLD)
    for i in indices:
        box = boxes<i>
        left = box[0]
        top = box[1]
        width = box[2]
        height = box[3]
        cv2.rectangle(input_image, (left, top), (left + width, top + height), BLUE, 3*THICKNESS)
        label = "{}:{:.2f}".format(classes[class_ids<i>], confidences<i>)
        draw_label(input_image, label, left, top)

    return input_image


if __name__ == '__main__':
    parser = argparse.ArgumentParser()
    parser.add_argument('--device', type=int, default=4, help='camera device number, 1 for CSI Camera with ISP, 4 for UVC in common case.')
    args = parser.parse_args()

    # open selected camera using selected API
    deviceID = args.device
    apiID = cv2.CAP_V4L2
    cap = cv2.VideoCapture()
    cap.open(deviceID, apiPreference=apiID)

    if deviceID == 1:
        cap.set(cv2.CAP_PROP_CONVERT_RGB, 0)


    # Load class names.
    classesFile = "coco.names"
    classes = None
    with open(classesFile, 'rt') as f:
        classes = f.read().rstrip('\n').split('\n')

    # Give the weight files to the model and load the network using them.
    modelWeights = "models/yolov5n.onnx"
    net = cv2.dnn.readNet(modelWeights)
    net.setPreferableBackend(cv2.dnn.DNN_BACKEND_OPENCV)
    net.setPreferableTarget(cv2.dnn.DNN_TARGET_OPENCL)
    while(cv2.waitKey(1) < 0):
        # Process image.
        ret, frame = cap.read()
        if deviceID == 1:
            frame = cv2.cvtColor(frame, cv2.COLOR_YUV2BGR_NV12)
        detections = pre_process(frame, net)
        img = post_process(frame.copy(), detections)

        # Put efficiency information. The function getPerfProfile returns the overall time for inference(t) and the timings for each of the layers(in layersTimes)
        t, _ = net.getPerfProfile()
        label = 'Inference time: %.2f ms' % (t * 1000.0 / cv2.getTickFrequency())
        cv2.putText(img, label, (20, 40), FONT_FACE, FONT_SCALE, RED, THICKNESS, cv2.LINE_AA)

        cv2.imshow('Output', img)
    cap.release()
    cv2.destroyAllWindows()
执行代码 python3 yolov5.py ,实时窗口显示摄像头探测画面。
效果
当检测到可识别的物体时,画面出现蓝色框选和识别结果,识别速度较快。

参考:基于 YOLO-V5 ONNX 模型的通用物体识别 , Object Detection using YOLOv5 OpenCV DNN in C++ and Python .
二维码识别
运行 Python 语言应用:
进入 Python 应用目录,以在昉·星光 2的 Debian 系统上运行二维码检测与解码 Python 演示代码:
cd /usr/share/doc/opencv-doc/examples/python/
python3 qrcode.py --device=4
代码
打开 qrcode.py 代码
#!/usr/bin/env python

'''
This program detects the QR-codes using OpenCV Library.

Usage:
   qrcode.py
'''


# Python 2/3 compatibility
from __future__ import print_function

import numpy as np
import cv2 as cv

import argparse
import sys
import webbrowser
import re
PY3 = sys.version_info[0] == 3
if PY3:
    xrange = range

class QrSample:
    def __init__(self, args):
        self.fname = ''
        self.fext = ''
        self.fsaveid = 0
        self.input = args.input
        self.detect = args.detect
        self.out = args.out
        self.multi = args.multi
        self.saveDetections = args.save_detections
        self.saveAll = args.save_all

    def getQRModeString(self):
        msg1 = "multi " if self.multi else ""
        msg2 = "detector" if self.detect else "decoder"
        msg = "QR {:s}{:s}".format(msg1, msg2)
        return msg

    def drawFPS(self, result, fps):
        message = '{:.2f} FPS({:s})'.format(fps, self.getQRModeString())
        cv.putText(result, message, (20, 20), 1,
                   cv.FONT_HERSHEY_DUPLEX, (0, 0, 255))

    def drawQRCodeContours(self, image, cnt):
        if cnt.size != 0:
            rows, cols, _ = image.shape
            show_radius = 2.813 * ((rows / cols) if rows > cols else (cols / rows))
            contour_radius = show_radius * 0.4
            cv.drawContours(image, [cnt], 0, (0, 255, 0), int(round(contour_radius)))
            tpl = cnt.reshape((-1, 2))
            for x in tuple(tpl.tolist()):
                color = (255, 0, 0)
                cv.circle(image, tuple(x), int(round(contour_radius)), color, -1)

    def drawQRCodeResults(self, result, points, decode_info, fps):
        if (not hasattr(self, 'saved_url')):
            self.saved_url = ''

        n = len(points)
        if isinstance(decode_info, str):
            decode_info = [decode_info]
        if n > 0:
            for i in range(n):
                cnt = np.array(points<i>).reshape((-1, 1, 2)).astype(np.int32)
                self.drawQRCodeContours(result, cnt)
                msg = 'QR[{:d}]@{} : '.format(i, *(cnt.reshape(1, -1).tolist()))
                print(msg, end="")
                if len(decode_info) > i:
                    if decode_info<i>:
                        print("'", decode_info<i>, "'")
                        match = re.findall('https?://(?:[-\w.]|(?:%[\da-fA-F]{2}))+', decode_info<i>)
                        if match and decode_info<i> != self.saved_url:
                            print("Open url:", match)
                            webbrowser.open_new(decode_info<i>)
                            self.saved_url = decode_info<i>
                    else:
                        print("Can't decode QR code")
                else:
                    print("Decode information is not available (disabled)")
        else:
            print("QRCode not detected!")
        self.drawFPS(result, fps)

    def runQR(self, qrCode, inputimg):
        if not self.multi:
            if not self.detect:
                decode_info, points, _ = qrCode.detectAndDecode(inputimg)
                dec_info = decode_info
            else:
                _, points = qrCode.detect(inputimg)
                dec_info = []
        else:
            if not self.detect:
                _, decode_info, points, _ = qrCode.detectAndDecodeMulti(
                    inputimg)
                dec_info = decode_info
            else:
                _, points = qrCode.detectMulti(inputimg)
                dec_info = []
        if points is None:
            points = []
        return points, dec_info

    def DetectQRFrmImage(self, inputfile):
        inputimg = cv.imread(inputfile, cv.IMREAD_COLOR)
        if inputimg is None:
            print('ERROR: Can not read image: {}'.format(inputfile))
            return
        print('Run {:s} on image [{:d}x{:d}]'.format(
            self.getQRModeString(), inputimg.shape[1], inputimg.shape[0]))
        qrCode = cv.QRCodeDetector()
        count = 10
        timer = cv.TickMeter()
        for _ in range(count):
            timer.start()
            points, decode_info = self.runQR(qrCode, inputimg)
            timer.stop()
        fps = count / timer.getTimeSec()
        print('FPS: {}'.format(fps))
        result = inputimg
        self.drawQRCodeResults(result, points, decode_info, fps)
        cv.imshow("QR", result)
        cv.waitKey(1)
        if self.out != '':
            outfile = self.fname + self.fext
            print("Saving Result: {}".format(outfile))
            cv.imwrite(outfile, result)

        print("Press any key to exit ...")
        cv.waitKey(0)
        print("Exit")

    def processQRCodeDetection(self, qrcode, frame):
        if len(frame.shape) == 2:
            result = cv.cvtColor(frame, cv.COLOR_GRAY2BGR)
        else:
            result = frame
        print('Run {:s} on video frame [{:d}x{:d}]'.format(
            self.getQRModeString(), frame.shape[1], frame.shape[0]))
        timer = cv.TickMeter()
        timer.start()
        points, decode_info = self.runQR(qrcode, frame)
        timer.stop()

        fps = 1 / timer.getTimeSec()
        self.drawQRCodeResults(result, points, decode_info, fps)
        return fps, result, points

    def DetectQRFrmCamera(self, device):
        cap = cv.VideoCapture(device, cv.CAP_V4L2)
        # FIXME: Auto convert property failed in CSI camera(NV12 format).
        if device == 1:
            cap.set(cv.CAP_PROP_CONVERT_RGB, 0)
        # Set UVC in 640*480 format as default
        cap.set(cv.CAP_PROP_FRAME_WIDTH, 640)
        cap.set(cv.CAP_PROP_FRAME_HEIGHT, 480)
        if not cap.isOpened():
            print("Cannot open the camera")
            return
        print("Press 'm' to switch between detectAndDecode and detectAndDecodeMulti")
        print("Press 'd' to switch between decoder and detector")
        print("Press ' ' (space) to save result into images")
        print("Press 'ESC' to exit")

        qrcode = cv.QRCodeDetector()
        while True:
            if device == 1:
                ret, frame_rgb24 = cap.read()
                frame = cv.cvtColor(frame_rgb24, cv.COLOR_YUV2BGR_NV12)
            else:
                ret, frame = cap.read()
            if not ret:
                print("End of video stream")
                break
            forcesave = self.saveAll
            result = frame
            try:
                fps, result, corners = self.processQRCodeDetection(qrcode, frame)
                print('FPS: {:.2f}'.format(fps))
                forcesave |= self.saveDetections and (len(corners) != 0)
            except cv.error as e:
                print("Error exception: ", e)
                forcesave = True
            cv.imshow("QR code", result)
            code = cv.waitKey(1)
            if code < 0 and (not forcesave):
                continue
            if code == ord(' ') or forcesave:
                fsuffix = '-{:05d}'.format(self.fsaveid)
                self.fsaveid += 1
                fname_in = self.fname + fsuffix + "_input.png"
                print("Saving QR code detection result: '{}' ...".format(fname_in))
                cv.imwrite(fname_in, frame)
                print("Saved")
            if code == ord('m'):
                self.multi = not self.multi
                msg = 'Switching QR code mode ==> {:s}'.format(
                    "detectAndDecodeMulti" if self.multi else "detectAndDecode")
                print(msg)
            if code == ord('d'):
                self.detect = not self.detect
                msg = 'Switching QR code mode ==> {:s}'.format(
                    "detect" if self.detect else "decode")
                print(msg)
            if code == 27:
                print("'ESC' is pressed. Exiting...")
                break
        print("Exit.")


def main():
    parser = argparse.ArgumentParser(
        description='This program detects the QR-codes input images using OpenCV Library.')
    parser.add_argument(
        '-i',
        '--input',
        help="input image path (for example, 'opencv_extra/testdata/cv/qrcode/multiple/*_qrcodes.png)",
        default="",
        metavar="")
    parser.add_argument(
        '-D',
        '--device',
        help='camera device number, 1 for CSI Camera with ISP, 4 for UVC in common case.',
        type=int,
        default=4)
    parser.add_argument(
        '-d',
        '--detect',
        help="detect QR code only (skip decoding) (default: False)",
        action='store_true')
    parser.add_argument(
        '-m',
        '--multi',
        help="enable multiple qr-codes detection",
        action='store_true')
    parser.add_argument(
        '-o',
        '--out',
        help="path to result file (default: qr_code.png)",
        default="qr_code.png",
        metavar="")
    parser.add_argument(
        '--save_detections',
        help="save all QR detections (video mode only)",
        action='store_true')
    parser.add_argument(
        '--save_all',
        help="save all processed frames (video mode only)",
        action='store_true')
    args = parser.parse_args()
    qrinst = QrSample(args)
    if args.out != '':
        index = args.out.rfind('.')
        if index != -1:
            qrinst.fname = args.out[:index]
            qrinst.fext = args.out[index:]
        else:
            qrinst.fname = args.out
            qrinst.fext = ".png"
    if args.input != '':
        qrinst.DetectQRFrmImage(args.input)
    else:
        qrinst.DetectQRFrmCamera(args.device)


if __name__ == '__main__':
    print(__doc__)
    main()
    cv.destroyAllWindows()
执行代码 python3 qrcode.py ,实时窗口显示摄像头探测画面。
效果
当检测到二维码时,终端输出对应的扫描值,识别速度较快。

详见:二维码检测与解码 .
图像边缘检测
运行 Python 语言应用:
进入 Python 应用目录,以在昉·星光 2的 Debian 系统上运行图像边缘检测 Python 演示代码:
cd /usr/share/doc/opencv-doc/examples/python/
python3 edge.py 4
该代码可实现图像边缘绘制。
代码
打开 edge.py 文件,代码如下:
#!/usr/bin/env python


This sample demonstrates Canny edge detection.

Usage:
  edge.py [<video source>]

  Trackbars control edge thresholds.


# Python 2/3 compatibility
from __future__ import print_function

import cv2 as cv
import numpy as np

# relative module
import video

# built-in module
import sys


def main():
    try:
        fn = sys.argv[1]
        cam = int(fn)
    except:
        fn = 0

    def nothing(*arg):
        pass

    cv.namedWindow('edge', 0)
    cv.resizeWindow('edge', 640, 480)
    cv.createTrackbar('thrs1', 'edge', 2000, 5000, nothing)
    cv.createTrackbar('thrs2', 'edge', 4000, 5000, nothing)

    cap = cv.VideoCapture(cam, cv.CAP_V4L2)
    if cam == 1:
        cap.set(cv.CAP_PROP_CONVERT_RGB, 0)

    while True:
        if cam == 1:
            ret, img_origin = cap.read()
            img = cv.cvtColor(img_origin, cv.COLOR_YUV2BGR_NV12)
        else:
            ret, img = cap.read()
        gray = cv.cvtColor(img, cv.COLOR_BGR2GRAY)
        thrs1 = cv.getTrackbarPos('thrs1', 'edge')
        thrs2 = cv.getTrackbarPos('thrs2', 'edge')
        edge = cv.Canny(gray, thrs1, thrs2, apertureSize=5)
        vis = img.copy()
        vis = np.uint8(vis/2.)
        vis[edge != 0] = (0, 255, 0)
        cv.imshow('edge', vis)
        ch = cv.waitKey(5)
        if ch == 27:
            break

    print('Done')


if __name__ == '__main__':
    print(__doc__)
    main()
    cv.destroyAllWindows()
终端执行 python3 edge.py 运行代码,自动弹出窗口显示实时画面。
效果
执行代码,窗口显示摄像头探测画面的实时边缘检测结果,识别速度较快,几乎没有延时。

参考:检测图像边缘 .